Showing posts with label Happy Birthday Card. Show all posts

Tuesday, April 26, 2022

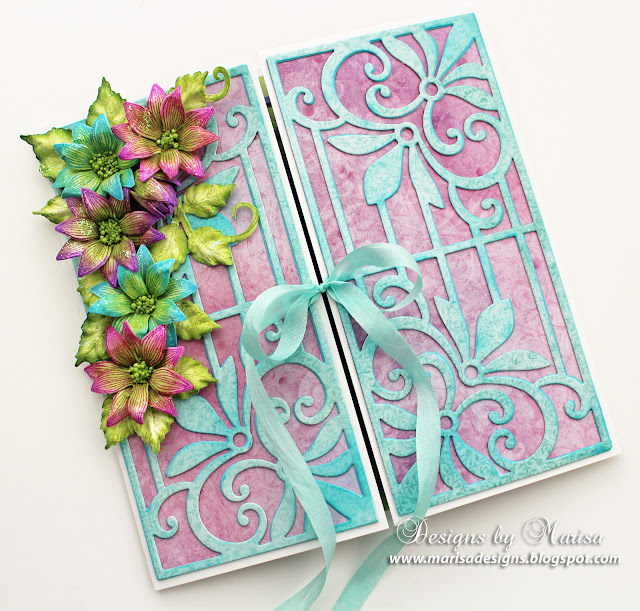
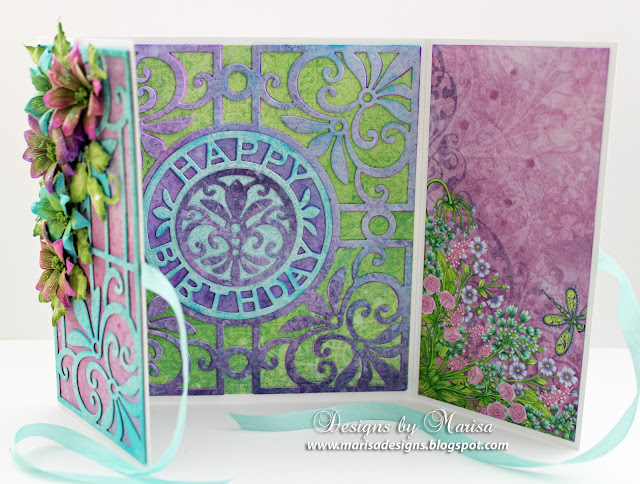
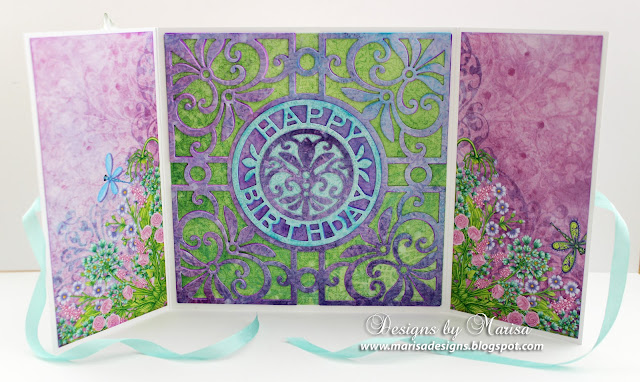
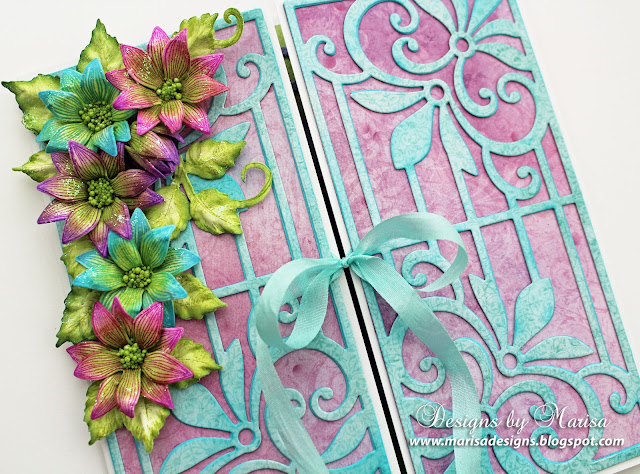
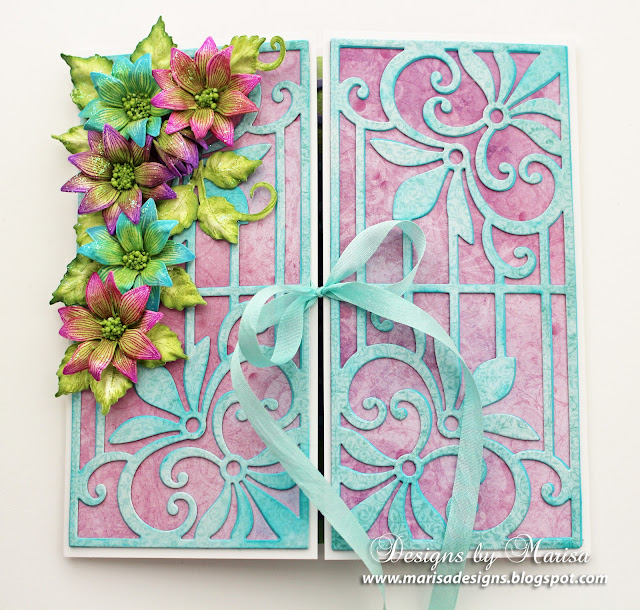
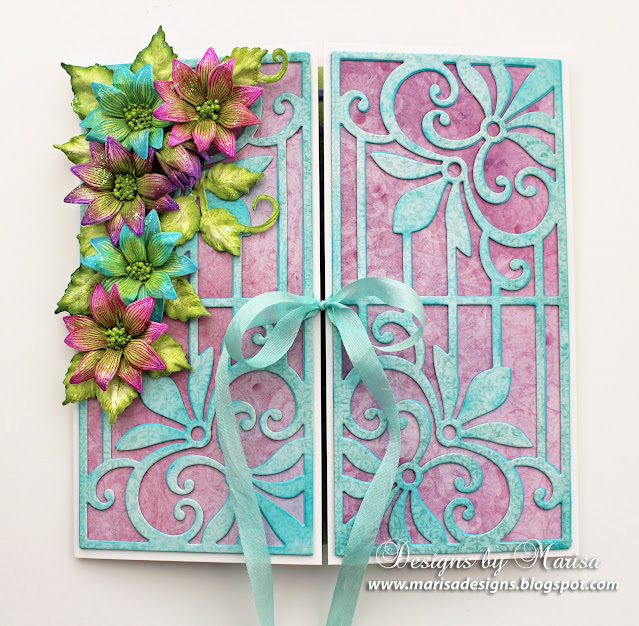
Heartfelt Creations - French Courtyard Gate Fold Card

Hello Friends, today I would like to show you how to make this card created with the new French Gate and French Courtyard Die sets by Heartfelt Creations. 


Heartfelt Creations Products:

HCD1-7398 French Courtyard Die

HCD1-7397 French Gate Die

HCPC-3980 Sweet Pea Cling Stamp Set

HCD1-7391 Sweet Pea Die

HCFB1-5010 Sweet Pea Shaping Mold

HCDP1-2138 Decorative Dragonfly Paper Collection

HCPC-3835 Leafy Accents Cling Stamp

HCD1-7193 Leafy Accents Die

HCFB1-467 3D Leafy Accents Shaping Mold

RACP436 Ranger Archival Ink Pad – Leaf Green

RACP494 Ranger Archival Ink Pad – Majestic Violet

RACP500 Ranger Archival Ink Pad – Paradise Teal

RACP985 Ranger Archival Ink Pad - Cactus Flower

HCDA2-450 Stack and Store Daubers-Pack of 30

HCST1-401 Deluxe Flower Shaping Kit

HCPP1-475 Deluxe Flower Shaping Paper Pack of 50 - White

159723 Designer Dries Clear Adhesive

ANC850 Spring Bling Prills – 12 Pack


Other Products:

Die cutting machine, hot glue gun, hot glue, paper trimmer, white cardstock, silk ribbon, Ranger Stickles – Crystal.

Instructions:

To make the 6” x 6” gate fold card base, cut a piece of white cardstock to 6” x 12”. Score at 3” and 9”. Fold at score lines towards the center to create a gate fold card.

To create card front, die cut 2 decorative pieces using French Gate Die set and Decorative Dragonfly Paper Collection. Die cut 2 backing pieces with contrasting color paper from the paper collection using border die and then glue pieces together. Attach 12” of silk ribbon to both flaps using tape. Glue decorative pieces to both front flaps to finish front of card.

Die cut decorative square and solid backing piece using French Courtyard Die set and paper collection. Glue pieces together and then attach to inside of card. Die cut Happy Birthday circle and center decorative piece. Glue pieces together and attach to center of square. Cover inside of card flaps with paper collection, die cut pieces with border die.

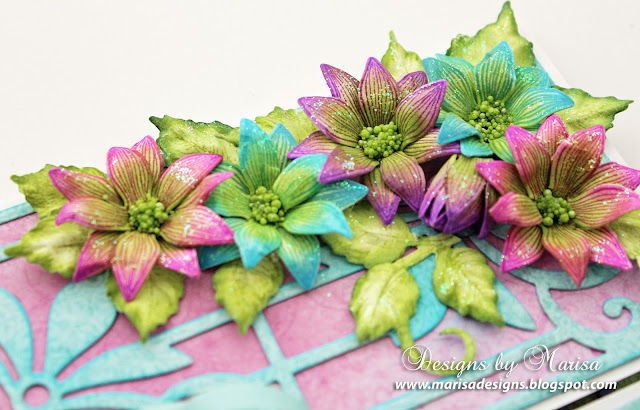
Stamp multiple flowers with Sweet Pea Cling Stamp set using archival ink pads in teal, violet and cactus onto flower shaping paper. Color flowers with archival inks and daubers, then die cut with matching die and shape with Sweet Pea shaping mold. Embellish center of flowers with green Prills.

Stamp Leafy Accents with green archival ink onto flower shaping paper. Die cut with matching die set, color with archival green ink and then shape with Leafy Accents shaping mold. Arrange flowers and leaves on front flap of card and then glue using hot glue. Using a brush, apply Crystal Stickles to flowers and leaves. 


Thanks for visiting! Hugs!


Marisa


Tuesday, July 6, 2021

Heartfelt Creations - Clematis Flower Happy Birthday

Hello Friends! I love making paper flowers and the Clematis Flower collection from Heartfelt Creations is just beautiful to work with. I also used a Heartfelt Creations decorative die set for the background. 


 Heartfelt Creations Products Used:

HCPC-3954 Clematis Cling Stamp Set.
HCD1-7355 Clematis Die.
HCFB1-5006 3D Clematis Shaping Mold.
HCPC-3835 Leafy Accents Cling Stamp.
HCD1-7193 Leafy Accents Die.
HCFB1-467 3D Leafy Accents Shaping Mold.
HCD2-7338 Lattice Flourish Gateway Die.
HCD1-7283 Courtyard Elegance Die.
HCS1-459-1 Assorted Pearl Stamens-Small.
RACP436 Ranger Archival Ink Pad - Leaf Green.
RACP985 Ranger Archival Ink Pad - Cactus Flower.
RACP454 Ranger Archival Ink Pad - Manganese Blue.
RACP430 Ranger Archival Ink Pad - Deep Purple.
HCDP1-2128 Climbing Clematis Paper Collection .
HCDA2-450 Stack and Store Daubers-Pack of 30.
HCST1-401 Deluxe Flower Shaping Kit.
HCPP1-475 Deluxe Flower Shaping Paper Pack of 50 - White
159723 Designer Dries Clear Adhesive

Other Products: 

Metallic Pearl cardstock, white card stock, die cutting machine, hot glue gun, hot glue, paper trimmer, foam tape, water brush. Nuvo Aqua Shimmer – Glitter Gloss brush marker. Cosmic Shimmer Pixie Sparkles by Creative Expressions in Beyond Blue, Purple Affair, Fuchsia Rose and Zesty Lime. 


Instructions:

Cut a piece of white cardstock to 6” x 12”, score at 6” and fold in half to create a 6” square card base. Die cut decorative square and circle using Courtyard Elegance die set from metallic pearl cardstock. Die cut plain square and circle using Climbing Clematis paper collection in purple and pink, adhere behind decorative circle and square. Adhere both pieces to card front using foam tape.

Stamp multiple flowers and leaves with Clematis stamp set onto flower shaping paper using archival ink pads in Cactus Flower and Manganese Blue for the flowers and Leaf Green for the leaves. Color flowers and leaves by mixing Pixie Sparkles powders with water brush. Let paper dry and then die cut with coordinating Clematis die set. Using Clematis shaping mold, shape flowers and leaves and then color borders with archival inks and daubers. Embellish center of flowers with white stamens.

Stamp Leafy Accents onto white shaping paper using Leaf Green archival ink pad. Die cut with coordinating die and then color with archival ink and dauber. Shape leaves with coordinating shaping mold.

Cut a 2” square piece from paper collection, mat with metallic pearl cardstock and adhere to center of card with foam tape. Die cut Happy Birthday from Lattice Flourish Gateway die set and glue to center of card.


Adhere flowers and leaves to top center of card as shown using hot glue. Add shimmer to leaves with Nuvo Aqua Shimmer brush marker. 
 

Thanks for visiting!! Have a great day! 

Marisa


Tuesday, May 4, 2021

Heartfelt Creations - Palace Gateway Happy Birthday

 Hello Friends, I have a new card to share with you created with Heartfelt Creations dies and rubber stamps. Creating the flowers is so easy with the rubber stamps, matching dies and the shaping molds!


Heartfelt Creations Products:

HCD2-7349 Palace Gateway Die
HCD2-7351 Iron work Sentiments Die
HCPC-3906 Small Wild Rose Cling Stamp
HCD1-7289 Small Wild Rose Die
HCFB1-486 Small Wild Rose Shaping Mold
HCPC-3835 Leafy Accents Cling Stamp
HCD1-7193 Leafy Accents Die
HCFB1-3D Leafy Accents Shaping Mold
HCDP1-2121 Dazzling Dahlia Paper Collection
RACP670 Ranger Archival Ink Pad – Tiger Lily
RACP524 Ranger Archival Ink Pad – Vibrant Fuchsia
RACP436 Ranger Archival Ink Pad – Leaf Green
RACP494 Ranger Archival Ink Pad – Majestic Violet
RACP500 Ranger Archival Ink Pad – Paradise Teal
HCDA2-450 Stack and Store Daubers-Pack of 30
HCST1-401 Deluxe Flower Shaping Kit
HCPP1-475 Deluxe Flower Shaping Paper Pack
159723 Designer Dries Clear Adhesive
ANC850 Spring Bling Prills – 12 Pack

Other Products:

Die cutting machine, hot glue gun, hot glue, paper trimmer, foam tape.

For more tips on creating with the Wild Rose Collection watch the tutorial at https://youtu.be/2ALPhFnT-qI.


Instructions:

Die cut card base using Palace Gateway Die from white cardstock. Die cut front layer from Dazzling Dahlia paper collection using same die. Die cut Happy Birthday sentiment using Iron Work Sentiment die set. Adhere to card with foam tape.

Stamp multiple flowers using Small Wild Rose stamp with Vibrant Fuchsia archival ink onto flower shaping paper. Die cut with coordinating Small Wild Rose die. Color flowers with archival inks and then shape with matching shaping mold. Embellish center of flowers with white Prills.

Stamp leaves using Leafy Accents stamp with Leaf Green archival ink onto flower shaping paper. Die cut with coordinating Leafy Accents die. Color leaves with archival inks and then shape with matching shaping mold. Adhere flowers and leaves around sentiment using glue gun.


Thanks for visiting!

Marisa


Tuesday, November 3, 2020

Heartfelt Creations - To My Sweet Friend Card

Hello Friends, I have a new card to share with you using Heartfelt Creations products. The Garden Zinnia flowers are one of my favorites. I had so much fun making these flowers. 


Heartfelt Creations Products:


HCD1-7314 Large Garden Zinnia Die

HCD1-7315 Small Garden Zinnia Die

HCPC-3924 Small Garden Zinnia Cling Stamp

HCPC-3923 Large Garden Zinnia Cling Stamp

HCFB1-491 Large 3D Zinnia Mold 1

HCFB1-492 Small 3E Zinnia Mold

HCD1-7263 Swirly Accent Spray Die

HCPC-3835 Leafy Accents Cling Stamps

HCD1-7193 Leafy Accents Die

HCFB1-3D Leafy Accents Shaping Mold

HCD1-7320 Fancy Special Day Die

HCPC-3935 Fancy Special Day Cling Stamp

HCDP1-2106 Wild Aster Paper Collection

ANC852 Bright Ideas Prills – 12 Pack

RACP524 Ranger Archival Ink Pad – Vibrant Fuchsia

RACP436 Ranger Archival Ink Pad – Leaf Green

RACP494 Ranger Archival Ink Pad – Majestic Violet

HCDA2-450 Stack and Store Daubers-Pack of 30

HCST1-401 Deluxe Flower Shaping Kit

HCPP1-475 Deluxe Flower Shaping Paper Pack

159723 Designer Dries Clear Adhesive


Other Products:

Ranger Distress Inks: Carved Pumpkin, Mowed Lawn, Mustard Seed, Picked Raspberry, Wilted Violet, Peacock Feathers. White metallic cardstock, hot glue gun, hot glue, paper trimmer, die cutting machine.


For more tips on creating with the Summer's Garden Collection watch the tutorial at https://youtu.be/kYiP8qJZ4rE.


Instructions:

Cut a piece of white cardstock to 7” x 14” size, fold in half. Die cut shaped card using outer frame die from the Swirly Accent Spray Die set. Fold front panel in half to create easel card. Die cut deep purple front panel and green inside panel from the Wild Aster paper collection using same outer frame die. Glue pieces to card base.  Die cut 4 decorative frames from white metallic cardstock. Glue to front and inside of the card.

Stamp multiple Zinnias with Garden Zinnia Cling Stamp sets in Vibrant Fuchsia ink onto white cardstock and die cut with coordinating dies. Stamp leaves in Leaf Green ink onto white cardstock, die cut with coordinating die. Color flowers and leaves with Distress inks using Daubers. Shape flowers using Deluxe Flower Shaping kit and Zinnia molds. Embellish center of flowers with Prills. Adhere flowers and leaves to center of front panel and inside panel. 

Stamp sentiment with Majestic Violet ink onto white cardstock, die cut with matching die and adhere to inside of card.


Thanks for visiting!

Marisa


Thursday, November 22, 2018

Heartfelt Creation - Happy Birthday to You Card

Hello Friends, I have a new card to share with you created with Heartfelt Creations new dies, rubber stamps and shaping mold for the flowers.


Products Used:

HCD1-7214 Ornate Pocket Accents Die


Other Products:

Neenah Paper White Cardstock, Spellbinders Platinum Die Cutting Machine, Tim Holtz Glass Media Mat, Nuvo Crystal Drops-Glitter Drops-Honey Gold.

For more tips on creating with the Oakberry Lane collection, watch the tutorial at https://youtu.be/HirfUN8NEYY

Instructions:

Create a 6 ¼” x 8 ¼” card base from white cardstock. Cut 2 smaller pieces from Camelia Carnation Paper Collection and layer on card base.
Die cut 2 Ornate Pocket Accents from white cardstock and then glue onto card front. Stamp “Happy Birthday to You” sentiment with black ink in the center of card.
Stamp Oakberry Lane Blossoms on white cardstock using pink ink for the flowers and green ink for the leaves. Die cut with coordinating Oakberry Lane Blossoms die and then color with Memento Inks and daubers.


Shape flowers and leaves with Blossoms Shaping Mold. Layer petals to form flowers and then adhere to card. Glue leaves under flowers as pictured. Adhere Minnie Pearls Prills to center of flowers. Embellish flowers and leaves with Glitter Drops.

Be sure to visit Heartfelt Creations Blog for more Inspiration.


Thanks for visiting! Hugs!


Marisa


Tuesday, June 20, 2017

Spellbinders Sunflower Shaker Card

Hello Friends! I am up on the Spellbinders Blog today showing you how to create this Happy Birthday shaker card using Spellbinders Sunflower Photo Holder die set from my Special Occasions Collection. The cute little girl in the picture is my 4 years old granddaughter.


Instructions:

1. Create a 6” x 6” card base from natural white cardstock. Cover front of card with designer cardstock.

2. Cut 3 more square layers measuring 4”, 4 ¾” and 5 ½”. Distress edges and then adhere to card with 3D foam squares.


3. Die cut 4 large sunflowers with Sunflower Photo Holder die set from designer cardstock. Die cut window to 2 of the sunflowers with smaller circle die in the set.


4. To create sunflower shaker, die cut foam circle with Standard Circles #4 and smaller circle from Sunflower die set. Die cut acetate circle and picture with Standard Circle #4.


5. To assemble sunflower shaker, layer 2 sunflower die cuts at the bottom, next picture, foam circle, micro-beads, acetate and lastly 2 sunflower die cuts. Use strong tape or glue between layers. Adhere sunflower shaker to center of card.


6. Die cut flowers and leaves with flower dies from Lattice Floral Basket die set using white Foamiran sheet. Color with archival inks, shape and adhere to card corner. Embellish center of flowers with micro-beads. Make a bow with silk ribbon and glue under flowers. 


7. Cover the inside of card with designer cardstock. Die cut Happy Birthday Pop-Up from designer cardstock.  


8. Fold at scored lines, adhere tape to tabs and then attach to inside of card center as pictured. 


Spellbinders Supplies:


Other Supplies: BoBunny Autumn Song Collection, Neenah Papers Natural White Cardstock, Acetate Sheet, May Arts Crème Silk Ribbon, Scrapbook Adhesive by 3L 3D Foam Squares, Foam Sheet, White Foamiran, Ranger Archival Ink Pads – Fern Green, Orange and Saffron, White Micro-beads.

Thanks for visiting! Hugs!

Marisa


Thursday, June 18, 2015

Happy Birthday Card - Craft Dies by Sue Wilson

Hello Friends,
I have another card created with Craft Dies by Sue Wilson. I love how detailed and intricate these dies are! I hope you are inspired to try them and add them to your collection of die templates.


I started by making a 7 1/4" x 7 1/4" card base with white metallic cardstock. I cut the next layer to 7" x 7" using designer cardstock.
I die cut 4 Configurations - Lattice Arched Adornment with white metallic cardstock and glued to a 4 1/2" x 4 1/2 square of designer cardstock and then glued to card base.
For the next layer, I die cut 2 Configurations - Petite Arched Adornment and glued to a 4" x 4" square of designer cardstock and then adhered to card center using foam squares for dimension.
For the sentiment I used Expressions Dies - Happy Birthday and white metallic cardstock.
The flowers and leaves were die cut with Finishing Touches - Classic Foldover FlowersFinishing Touches - Mosaic LeavesFinishing Touches - Camellia - Complete PetalsFinishing Touches - Dandelion Clocks. I used distress inks to add color to the flowers and leaves.


Supplies:

Craft Dies by Sue Wilson: Configurations - Lattice Arched Adornment, Configurations - Petite Arched Adornment, Expressions Dies - Happy Birthday, Finishing Touches - Classic Foldover Flowers, Finishing Touches - Mosaic Leaves, Finishing Touches - Camellia - Complete Petals, Finishing Touches - Dandelion Clocks.
Creative Expressions Craft Dies by Sue Wilson.

Other Supplies: The Besties 8 x 8 Paper Pack, White Metallic Cardstock, Foam Squares, Ranger Distress Ink Pads.


Thanks for visiting! Hugs!

Marisa