Thursday, September 10, 2015

Heartfelt Creations - Enchanted Mum Four Step Card Tutorial

Hello Friends!
I love making step cards with fancy folds, the die set I used for this card base makes it really easy and it works great with the beautiful papers, stamps and dies from the Enchanted Mum Collection.
Here is the finished card opened:


Here is the finished card closed:


Supplies Needed:

Bright Ideas Prills           

Other Products:
Spellbinders Happy Days Die Set, Grand Calibur, Neenah Papers Natural White Cardstock, BoBunny Blush Double Dot Cardstock, Memento Tuxedo Black Ink, Ranger Distress Ink Pads (Picked Raspberry, Shaded Lilac, Spun Sugar, Bundled Sage, Dried Marigold, Brushed Corduroy), Foam Squares, Glue.

Instructions:

Step 1:

Die cut 4 step card base using Spellbinders Happy Days die set and pink cardstock. Using small square dies from the set, die cut 4 small images from the Enchanted Mum paper collection.
This is the Spellbinders Happy Days die set:


Step 2:

Fold 4 step card base at creases created by the die. Die cut 2 scalloped borders using pink cardstock. 


Step 3:
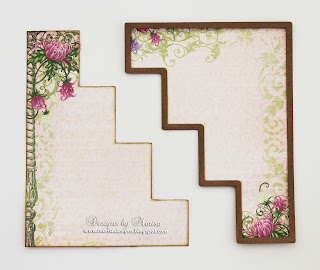
Die cut 2 panels for step card base using step insert die from set and a 6” x 6” square front from paper collection.


Step 4:

Color the edges of all the pieces using distress brown ink.


Step 5:

Glue 4 small square images and left and right step panel cuts from paper collection onto pink step card base as pictured.

Step 6:

Stamp Enchanted Mum set onto natural white cardstock multiple times using ColorBox Fluid Chalk Ink in several colors. Die cut with coordinating Enchanted Mum die.  You need 5 pieces of the smallest flower to make one Mum and only 2 pieces for the Daisy. I created a total of 3 Mums and 2 Daisies for this card.

Step 7:


Color the edges of flowers with distress or chalk inks.  Shape flowers using Deluxe Flower Shaping Kit. I used the 8mm tip and the curler tip in the set.  Layer 5 pieces together using glue to form Mum.  Shape and color 2 flower pieces to form Daisies and embellish center with Prills.

Step 8:


Stamp Open Leaf and Classic Leaf sets with black ink onto natural white cardstock.  Die cut with coordinating Classic Leaf die set.  Stamp dragonflies swirl from Enchanted Mum Bouquet set and die cut with coordinating die from Enchanted Dragonflies die set.  Stamp sentiment banner from Enchanted Dragonflies set and die cut with coordinating die from Enchanted Dragonflies die set. Color all pieces with distress inks.

Step 9:


Glue scalloped borders to left and right edge of step card base.  Layer Mums, Daisies, dragonflies, leaves, swirls and sentiment banner on step card base using glue and foam squares.

I hope you are encouraged to make this card, they are a lot of fun and you can use any of your favorite Heartfelt Creations Collections.


Thanks for visiting! Hugs!

Marisa


Tuesday, September 8, 2015

Heartfelt Creations - Celebrating Your Special Day Card

Hello Friends,
Swing open the decorative wrought iron gates and escape to serene and alluring garden surroundings with the Heartfelt Creations Enchanted Mum Collection.  Take in the beauty of shimmering dragonflies as they glide through warm and gentle breezes, landing to perch on beautiful bouquets of chrysanthemums dancing in the sunlight.  Graceful flowing floral images and exquisite die cuts along with soft hues of pinks, purples, greens and yellows are sure to bring about a sense of peace and calm to your soul.  Create your very own impeccable garden themed designs with the assortment of light and airy mums taking centre stage in five gloriously illustrated stamp sets along with swirling vines and beautifully detailed dragonflies, all of which mirror the stunning images found within this enchanting paper collection.  Create authentic, true to life blossoms and embellishments with three coordinating dies, perfect to grace your scrapbook layouts and original card creations.  Whether you are celebrating special occasions or  preserving precious family memories, an enchanting time of creativity awaits you with the Enchanting Mum Collection.  


Celebrating Your Special Day – Enchanted Mum Collection

Products Used:


Other Products:

Neenah Papers Natural White Cardstock, Memento Tuxedo Black Ink, Color Box Chalk Ink Pad (Rouge, Harvest), Ranger Distress Ink Pad (Peeled Paint), Silk Ribbon in Lavender, Pearls, Foam Squares.
Watch this video: https://youtu.be/jJBwQyyza6g to learn how to shape the Enchanted Mums.

Project Instructions:

Card base measures  5” x 7”. To create Gatefold Card, cut a 7” x 10” piece of white cardstock, score on the long side at 2 ½” and 7 ½”.  Cover front panels and inside of card with Enchanted Mum Paper Collection. Fold panels to center as pictured. Stamp sentiment on inside panel with black ink.
Stamp 2 Dragonfly Vines on white cardstock with black ink, die cut with coordinating die from the Enchanted Dragonflies die set.  Color vines with distress inks and adhere to front panels.
Stamp Enchanted Mums with chalk ink and die cut with coordinating die. Color the edges of flowers with chalk inks, shape with Flower Shaping Kit and adhere to card. Stamp and die cut Arianna Blooms, color with chalk ink, shape and adhere to card. Embellish flowers with pears and Prills.
Stamp and die cut Classic Leaf, color with distress ink and glue to card under flowers.
Punch 2 holes if the center of card and tie with silk ribbon.

Be sure to visit Heartfelt Creations Blog for more Inspiration.


Thanks for visiting! Hugs!

Marisa


Saturday, September 5, 2015

Craft Hoarders Anonymous Hop - Just a Note Card

Hello Friends,
Welcome to the September Craft Hoarders Anonymous Hop! You should be coming to my blog from Karen's Blog. After visiting me, hop over to Christy's Blog next. To start at the beginning of the hop, and for the full list of Bloggers, go to Gloria's Blog.


To create this card I started by die cutting the card base using Noble Dies - Classic Adorned Design from Desert Storm cardstock. The next layers were die cut and embossed using Noble Dies - Ornate Pierced Rectangles and Noble Dies - Lavish Accented Design. I used designer paper, natural white and kraft cardstock. I adhered the layers using foam squares to add dimension. The sentiment was die cut with Expressions Dies - Just a Note from black cardstock.
The flowers and leaves were die cut using Finishing Touches - Delicate Fronds, Finishing Touches - Camelia - Complete Petals from designer paper. I shaped the flowers and added some color with distress inks and gesso.


Supplies:

Creative Expression - Craft Dies by Sue Wilson:
Noble Dies - Lavish Accented Design, Noble Dies - Classic Adorned Design, Noble Dies - Ornate Pierced Rectangles. Finishing Touches - Delicate Fronds, Finishing Touches - Camelia - Complete Petals. Expressions Dies - Just a Note.

Other Supplies: Neenah Papers Natural White, Black and Desert Storm Cardstock, The Paper Studio Poetic Postage Paper Pack, Ranger Distress Inks, Gesso.


Be sure to visit the links below for more inspiration.


Craft Hoarders Anonymous Blog Hop List:

Gloria Stengel 
Vicki Robertson
Debbie Seyer
Ginny Nemchak (on vacation, hop on to Pam's Blog)
Pam Bray
Jacquie Southas
Glenda Brooks
Amber Milone
Tracey Sabella
Donna Idlet
Bonnie Garby
Nancy Dynes
Wendi Robinson
Teresa Horner
Kathy Clement
Jan Ennenga
Barbara Rankin
Karen Zueger-Brownell
Marisa Job (here)
Christy Houser


Thanks for visiting!! Hugs!

Marisa


Monday, August 31, 2015

Joy Clair - Thinking of You Card

Hello Friends,
Welcome to the last day of the Joy Clair August Release. Today we have a beautiful stamp set to share with you called Paisley Bouquet Clear Stamps.


To create this card I die cut the card base with Spellbinders Happy Days die set from natural white cardstock and then folded at the crease lines created by the die. The top step layers were also die cut from natural white cardstock . 
I stamped the larger flower image from the Paisley Bouquet Clear Stamps set on the top step layers using Versamark and white embossing powder and then heat set. I used Color Burst watercolors to color both step layers and then glued to card base. The flowers for the 4 step squares were also stamped and colored the same way. I fussy cut the flowers and adhered to 4 step squares. 
I die cut the scalloped borders and small flowers from the die set and adhered to card as pictured. 
The sentiment was stamped with black ink onto natural white cardstock and die cut with Spellbinders Oval Floral. 


Supplies:


Spellbinders Dies: Happy Days Die Set, Oval Floral

Other Supplies: Neenah Papers Natural White Cardstock, Color Burst Watercolor Powders by Ken Oliver, Ranger Distress Inks, Memento Tuxedo Black Ink, Versamark, White Embossing Powder.

Be sure to visit the links below for more inspiration.


Thanks for visiting!! Hugs!

Marisa


Sunday, August 30, 2015

Joy Clair - Thank you for Everything

Hello Friends,
Welcome to Day 7 of the Joy Clair August Release. Today we are showcasing Thank You for Everything Clear Stamps, a set of 34 clear stamps.


For this card I created a 7 1/2" x 7 1/2" card base with kraft cardstock. 
I stamped the sentiment from the Thank You for Everything Clear Stamps set on natural white cardstock using black ink. 
For the decorative frames around the sentiment I used Craft Dies by Sue Wilson, Portuguese Collection - Lisbon and Canadian Collection - Montreal. For the border I used Configurations - Elegant Laced Edger and for the flower and leaves I used Finishing Touches - Camellia - Complete Petals and Finishing Touches - Delicate Fronds. 


Supplies:


Other Supplies: Neenah Papers Natural White Cardstock, Kraft Cardstock, kaiser Craft Rustic Harmony Collection, Ranger Distress Inks, Memento Tuxedo Black Ink, Foam Squares.

Be sure to visit the links below for more inspiration.


Thanks for visiting! Hugs!

Marisa


Thursday, August 27, 2015

Joy Clair - Cozy Snowmen Wishes

Hello Friends,
Welcome to Day 4 of the Joy Clair August release. Today we are showcasing Cozy Snowmen Wishes Clear Stamps, a set of 21 Christmas clear stamps, I love the cute snowmen in this set!!


As part of our Joy Clair Launch Celebration a special promotion - Receive Free Shipping on all US orders (any size) using the following coupon code at check out Sept-Promo-1 (code must be enter exactly as written with upper and lowercase letters and dashes). Coupon Code expires Sept. 3oth. 

To create the step card base I die cut Spellbinders Decorated Birthday from green cardstock. Fold at creases created by the die.
I stamped the snowmen from the Cozy Snowmen Wishes Clear Stamps set on white cardstock using black ink. I fussy cut the snow men, colored with Copic markers and then adhered to card with foam squares.
To die cut the Poinsettias and Holly Sprays I used Craft Dies by Sue Wilson, Festive Collection - Classic Poinsettia, Festive Collection - Mosaic Poinsettia, Festive Collection - Holly Sprays, Festive Collection - Holly Accessory Kit. I used distress inks to color them.


Supplies:

Joy Clair: Cozy Snowmen Wishes Clear Stamps.

Spellbinders Dies: Decorated Birthday.

Creative Expressions, Craft Dies by Sue Wilson: Festive Collection - Classic Poinsettia, Festive Collection - Mosaic Poinsettia, Festive Collection - Holly Sprays, Festive Collection - Holly Accessory Kit.

Other Supplies: Green, Red and White Cardstock, Memento Tuxedo Black Ink, Copic Markers, Ranger Distress Inks, White Pearls.

Be sure to visit the links below for more inspiration and a chance to win some stamps.

Marisa Job (here)


Thanks for visiting! Hugs!

Marisa


Wednesday, August 26, 2015

Joy Clair - Hugs and Smiles Clear Stamps

Hello Friends,
I have 2 posts for today, please scroll down to see my Heartfelt Creations project.
Welcome to Joy Clair August Release! Today we have another beautiful set to share with you called Hugs and Smiles Clear Stamps.


Card base measures 6" x 6".
To create this card I stamped the circles and sentiment from the Hugs and Smiles Clear Stamps set on a 4" x 4" designer cardstock square using black ink.
The floral frame was die cut with Spellbinders Triple Floral and the flowers were die cut using Spellbinders Pretty Petals B, Spellbinders Pretty Petals D and Spellbinders Sprigs. I colored the flowers and leaves with distress inks.


Supplies:

Joy Clair Stamps: Hugs and Smiles Clear Stamps

Spellbinders Dies: Spellbinders Triple Floral,  Spellbinders Pretty Petals B, Spellbinders Pretty Petals D and Spellbinders Sprigs.

Other Supplies: Neenah Papers Natural white and Green Cardstock, Prima Marketing Art Journal Pad, Ranger Distress Inks, Foam Squares, Silk Ribbon, Micro Beads.

Be sure to visit the links below for more inspiration.


Marisa Job (here)


Thanks for visiting! Hugs!


Marisa


Tuesday, August 25, 2015

Heartfelt Creations - Preserved For You Card

Hello Friends,
Today I have a 4 step card to share with you created with Heartfelt Creations Farmers Market Collection. The 4 step card base was created with Spellbinders Happy Days die set. I will have a step by step tutorial on how to make a similar card on September 11th.


Preserved For You

Products Used:


Other Products:

Neenah Paper Desert Storm and Natural White Cardstock, Ranger Distress Inks (Seedless Grapes, Ripe Persimmon, Peeled Paint), Spellbinders Happy Days Die, Spellbinders Grand Calibur, Twine.

Project Instructions:

Create card base by die cutting Spellbinders Happy Days die with kraft cardstock.  Die cut panels to cover card base with Farmers Market paper collection. Die cut 4 small square designs from paper collection and adhere to card base center squares. Fold card at crease marks created by the die.
Die cut tag from paper collection and attach to right side of card with foam squares.
Stamp berries and leaves with black ink onto natural white cardstock, die cut with coordinating dies. Color berries and leaves with distress inks and adhere to card using foam squares.
Stamp and die cut Poppies, color with distress ink. Shape flowers with Deluxe Flower Shaping Kit, embellish center of flowers with Prills and adhere to card. To see a video on Flower Shaping with the Blazing Poppy Collection go HERE.


Be sure to visit Heartfelt Creations Blog for more Inspiration.


Thanks for visiting! Hugs!


Marisa


Joy Clair - Bandana Bits Clear Stamps

Hello Friends,
This week I will be guest designing for a new company, Joy Clair. They have several beautiful stamp sets for their August release. Today we are showcasing Bandana Bits Clear Stamps, a set of 10 clear stamps.


I created the background by stamping Bandana Bits corner stamp on white watercolor cardstock using Versamark and white embossing powder and then heat set. To color the background I used Ken Oliver Color Burst microfine watercolor powders in Terre Verte and Indigo. 
The white frames were die cut with Spellbinders Triple Floral and the flowers were die cut with Spellbinders Flower Play.

Supplies:

Joy Clair Clear Stamps: Bandana Bits Clear Stamps.
Spellbinders Dies: Flower Play, Triple Floral.

Other Supplies: Ken Oliver Color Burst in Terre Verte and Indigo, Watercolor cardstock, Micro Beads, Foam Squares, Memento Tuxedo Black Ink Pad, Purple Silk Ribbon, Versamark, White Embossing Powder. 


Please be sure to visit the Joy Clair Bog to see all of the New Releases and for a chance to win some stamps!! For more inspiration visit the links below with some wonderful Guest Designers.  


Marisa Job (here)


Thanks for visiting! Hugs!

Marisa