Tuesday, March 31, 2015

JustRite Papercraft April Release - Grand Handwritten Sentiments Clear Stamps

Hello Friends,
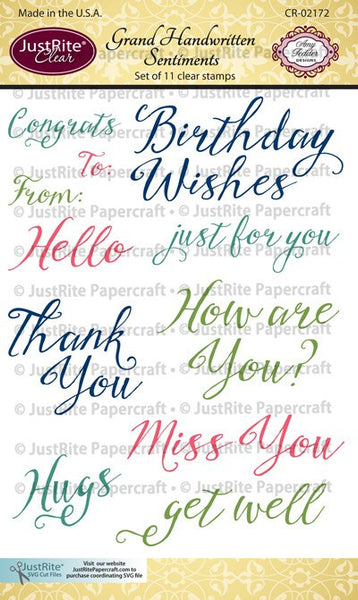
Welcome to Day One of the JustRite Papercraft April Release. Today we are showcasing Grand Handwritten Sentiments Clear Stamps. This is a great set for those special occasions. For my card I also used several beautiful die sets from the Craft Dies by Sue Wilson Collection.


   Grand Handwritten Sentiments Clear Stamps


Instructions:

1. My finished card measures 5" x 7". 
To create the Double Z-Fold card base, cut a 7" x 13" rectangle using white cardstock. 
Score at 1 1/2", 4", 9" and 11 1/2". Fold panels towards the center as pictured. 
2. Die cut front panels using Gemini Dies - Orion. Cover Panels with designer cardstock. 
3. Stamp sentiment from Grand Handwritten Sentiments Clear Stamps with brown ink onto designer cardstock. Die cut sentiment and white decorative frame using Caribbean Island Collection - ST Kitts. Adhere to card with foam squares. 
4. Die cut flowers and leaves using Finishing Touches - Camellia - Complete Petal and designer cardstock, color edges of flowers with distress inks. Shape flowers and adhere to card as pictured. 
5. Die cut fronds using Finishing Touches - Delicate Fronds and adhere to card under flowers. 
6. Embellish center of smaller flowers with Cosmic Shimmer PVA Glue.


Supplies: 


Other Supplies: Grand Calibur Die Cutting Machine, Maja Design - Vintage Summer Basics Paper Collection, Neenah Papers - Solar White Cardstock, Ranger Distress Mini Ink Pad - Victorian Velvet, Memento Ink Pad - Rich Cocoa, Foam Squares. 

Be sure to visit the links below for more inspirations from the Design Team.


Marisa Job (here)


Thanks for visiting! Hugs!

Marisa


Tuesday, March 24, 2015

Heartfelt Creations - Always and Forever Card


Hello Friends,
It's Wednesday and that means its time to share a card created with Heartfelt Creations beautiful papers, rubber stamps and dies from the Peacock Paisley Collection.


Products Used:


Other Products:

Orange, Green  and Blue Cardstock,  White Metallic Cardstock, Ranger Distress Mini Ink Pads (Faded Jeans and Fired Brick), Ranger Diamond Stickles, Spellbinders Grand Calibur, foam squares, hot glue gun.

Project Instructions:

Create a  6” x 6” card base using orange cardstock. Cut a smaller piece from the Peacock Paisley Paper Collection, distress edges and adhere to card. Cut 2 more layers measuring  5” x 5” and  4” x 4”, distress edges and mat with orange cardstock. Adhere layers to card using foam squares.
Stamp Delightful Daisies onto orange and blue cardstock with chalk brown ink. Die cut with coordinating Delightful Daisy Die set. Stamp leaves onto green cardstock with brown chalk ink and die cut with coordinating die. Shape flower and leaves with shaping kit.
Die cut lace flower and vine from the Arianna Lace Die set using white metallic and green cardstock. Glue pieces to card front.  Arrange flowers and leaves and adhere to card using hot glue gun. Embellish center of flowers with Stickles.
Die cut sentiment from the paper collection with ticket die from the Luggage and Tags Die set. Adhere sentiment to card with foam squares.


Be sure to visit Heartfelt Creations Blog for more Inspiration.


Thanks for visiting! Hugs!

Marisa


Tuesday, March 10, 2015

Heartfelt Creations March Release - Peacock and Delightful Daisies Card

Hello Friends,
Brighten your world with the sparkling colors and mesmerizing motifs of Peacock Paisley, the exquisite spring release from Heartfelt Creations.  This lush collection sparkles with jewel tones of topaz, sapphire, amber, emerald and turquoise.  The artistic flair of exotic peacocks, intricate paisleys, frilled feathers and delightful daisies will captivate your imagination and energize your creativity.  Six sumptuous sets of intricately designed, deeply etched red rubber stamps are the perfect companions to a vibrant paper collection that is overflowing with card fronts, cut apart pages, vivid artwork, pre-designed layouts and beautifully layered backgrounds.  The Delightful Daisy Die cuts 7 perfect floral layers with one pass through your cutting system.  Whether you want to preserve life's most beautiful moments, create with mixed media techniques or design keepsake cards, you'll be proud as a peacock to present the sophisticated elegance of Peacock Paisley.
Heartfelt Creations March Release Peacock Paisley Collection.


Products Used:


Other Products:

Neenah Paper Natural White Cardstock, Blue Cardstock, Memento Tuxedo Black Ink, Ranger Distress  Ink Pads in Broken China, Cracked Pistachio, Faded Jeans, Peeled Paint and Scattered Straw; Spellbinders Regal Frame Die, Spellbinders Grand Calibur, Glue Gun, Foam Squares.


Project Instructions:

Create a 6” x 6” top fold card base using blue cardstock. Cut the card front from the Peacock Paisley paper collection, distress edges and adhere to card base.
Die cut Spellbinders Regal Frame from blue cardstock and adhere to card using foam squares.
Stamp Feathery Peacock onto natural white cardstock using black ink. Color peacock with Distress Inks and adhere to Regal Frame.
Stamp several sets of Delightful Daisies and leaves onto natural white cardstock using blue Distress Ink. Die cut with coordinating Delightful Daisy Die. Color daisies with Distress Inks, shape and then glue petals together to form flowers. Add yellow Prills to the center of flowers and adhere to card. Color leaves with green Distress Ink, shape and adhere to card under flowers.

Be sure to visit Heartfelt Creations Blog for more Inspiration.


Thanks for visiting! Hugs!

Marisa


Friday, March 6, 2015

JustRite Papercraft March Release - Extended Family Large Fancy Sentiments

Hello Friends,
Welcome to Day Four and last of the JustRite Papercraft March Release. Today we are showcasing Extended Family Large Fancy Sentiments Clear Stamps. This set is very versatile and I know I will be using it quite often.


   Extended Family Large Fancy Sentiments Clear Stamps


Instructions:

1. Die cut card base with white and pink cardstock using Spellbinders Victorian Medallion Three.
2. Die cut next layer using Spellbinders Labels Forty-Two and Labels Forty Two Decorative Elements. Stamp sentiment from the set Extended Family Large Fancy Sentiments Clear Stamps with black ink. Adhere to card using foam squares. 
3. Die cut flowers and leaves with designer paper using Spellbinders dies Pretty Petals B, Pretty Petals C and Pretty Petals D. Die cut small leaves using Sprigs. Shape flowers and leaves and adhere to card using foam squares. Embellish center of flowers with Cosmic Shimmer Coloured PVA Glue in Pastel Pink
4. Make bow using pink silk ribbon and adhere to card with glue. 


Supplies:


Other Supplies: Pink, Green and White Cardstock, Prima Marketing Art Journal, Foam Squares, Silk Ribbon, Cosmic Shimmer Coloured PVA Glue in Pastel Pink.


Be sure to visit the links below for more inspiration from the Design Team.

Thanks for visiting! Hugs!

Marisa


Thursday, March 5, 2015

JustRite Papercraft March Release - Happy Birthday Masculine Card

Hello Friends,
Welcome to Day Three of the JustRite Papercraft March Release. Today we have 2 beautiful stamp sets to share with you, A2 Woodgrain Upcycled Frame Cling Background Stamp and Stacking Sentiments Clear Stamps. I think these sets are perfect for masculine cards.


      A2 Woodgrain Upcycled Frame Cling Background Stamp      Stacking Sentiments Clear Stamps


Instructions:

1. Make a 5 1/2" x 6 1/2" card base with black cardstock.
2. Using designer paper, cut a  5 1/4" x 6 1/4" piece, adhere to card base.
3. Stamp A2 Woodgrain Upcycled Frame Cling Background Stamp on designer paper with black ink. Cut around frame and then mat with black cardstock. Stamp sentiment from the set Stacking Sentiments Clear Stamps on frame and adhere to card base using foam squares.
4. Die cut ivy using Craft Dies by Sue Wilson - Finishing Touches - Trailing Ivy with green cardstock. Adhere to card base using foam squares.
5. Make a bow with twine and adhere to card.

Supplies:

JustRite Papercraft: A2 Woodgrain Upcycled Frame Cling Background StampStacking Sentiments Clear Stamps.

Creative Expressions - Craft Dies by Sue Wilson: Finishing Touches - Trailing Ivy.

Other Supplies: Black and Green Cardstock, Prima Marketing Timeless Memories Paper Collection, Memento Tuxedo Ink, Foam Squares, Twine, Silver Brads.


Be sure to visit the links below for more inspiration from the Design Team.


JustRite Inspiration 

Debbie Olson

Becca Feeken

Eva Dobilas 

Kristi Schurr

Marisa Job (here)

Michele Kovack

Darsie Bruno

Heidi Blankenship

Margie Higuchi  


Thanks for Visiting! Hugs!

Marisa 


Wednesday, March 4, 2015

JustRite Papercraft March Release - Coffee House Clear Stamp

Hello Friends!
Today is Day Two of the JustRite Papercraft March Release. I love the new stamp set Coffee House Clear Stamps. This set has 25 clear stamps for all you coffee lovers!


 Coffee House Clear Stamps


Instructions:

I started by die cutting and embossing a card base with kraft cardstock using Noble Dies - Classic Adorned Rectangles (Craft Dies by Sue Wilson). I colored the raised areas of the embossed frame with distress inks. I die cut the next layer with natural white cardstock using the next frame in the set and adhered to card with foam squares. 
The sentiment from the set Coffee House Clear Stamps was stamped on natural white cardstock with black ink and then die cut with smaller oval die from the set. 
The flowers, leaves and swirls were die cut with Craft Dies by Sue Wilson - Finishing Touches - Cornflowers and Finishing Touches - Blossoming Branch. I used distress inks to color the flowers.  I embellished the center of the cornflowers with goosebumps rhinestones and Cosmic Shimmer - Cosmic Pearl PVA for the center of the tiny flowers. 


Supplies:

JustRite Papercraft: Coffee House Clear Stamps.


Other Supplies: Kraft Cardstock, Neenah Papers Natural White Cardstock, Ranger Distress Mini Ink Pads, Memento Tuxedo Black Ink, Cosmic Shimmer - Cosmic Pearl PVA, Foam Squares.

Be sure to visit the links below for more inspiration from the Design Team.


Marisa Job (here)


Thanks for visiting! Hugs!

Marisa


Tuesday, March 3, 2015

JustRite Papercraft March Release - Romantic Wild Roses Card

Hello Friends,
Welcome to Day One of the JustRite Papercraft March Release. Today we have a beautiful stamp set to showcase called Romantic Wild Roses Clear Stamps. You can also download and print the Romantic Wild Roses Multi Stamping Tip Sheet for instructions on how to use the stamps. For my card I also used the gorgeous Craft Dies by Sue Wilson to make the card base and for the fronds.


   Romantic Wild Roses Clear Stamps   

Romantic Wild Roses Clear Stamps


For my card base I used Noble Dies - Ornate Pierced Rectangles (Craft Dies by Sue Wilson). I die cut the frame in pink cardstock and the card base in white cardstock. 
I stamped the flowers using Romantic Wild Roses Clear Stamps with chalk inks onto white cardstock. I followed instructions from Romantic Wild Roses Multi Stamping Tip Sheet. I stamped extra flowers, fussy cut them and adhered to stamped flowers using foam squares for dimension. For the fronds I used Finishing Touches - Delicate Fronds (Craft Dies by Sue Wilson).
I stamped sentiment from the set Large Fancy Sentiment using black ink. For the bow I used green silk ribbon.


Supplies:


Creative Expressions - Craft Dies by Sue Wilson: Noble Dies - Ornate Pierced Rectangles,  Finishing Touches - Delicate Fronds.

Other Supplies: Neenah Papers Solar White Cardstock, Pink Cardstock, Memento Tuxedo Black Ink, Color Box Chalk Ink in Pink Pastel, Lime Pastel, Rouge and Yellow Ochre; Foam Squares.


Be sure to visit the links below for more inspiration from the Design Team.


JustRite Inspiration

Darsie Bruno

Marisa Job (here)

Eva Dobilas

Michele Kovack

Kathy Jones

Kristi Schurr

Heidi Blankenship


Thanks for visiting! Hugs!

Marisa