Tuesday, December 1, 2020

Heartfelt Creations Dazzling Dahlia Card

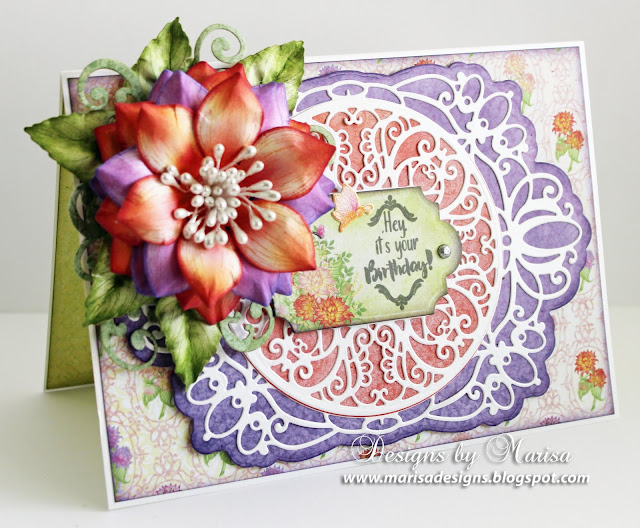
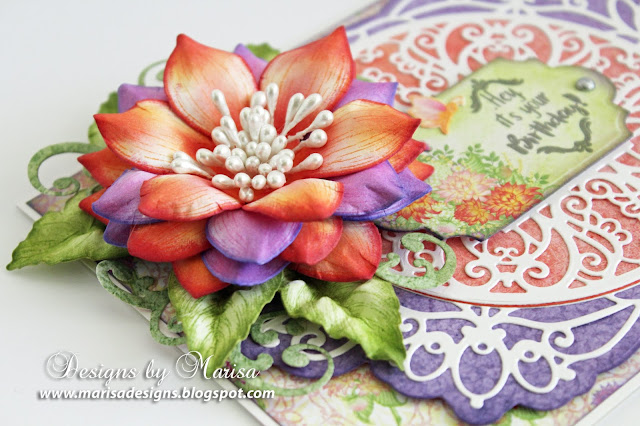
 Hello Friends, I would like to share another card created with Heartfelt Creations products. The new Dazzling Dahlia flower is just beautiful. 


Heartfelt Creations Products:


HCD1-7283 Courtyard Elegance Die
HCD1-7306 Decorative Circle Frames
HCPC 3928 Dazzling Dahlia Cling Stamp
HCPC-3929 Dahlia and Leaves Cling Stamp
HCD1-7323 Dazzling Dahlia Die
HCD1-7324 Dahlia and Leaves Die
HCFB1-494 3D Dahlia Shaping Mold
HCD1-7262 Swirly Border Accents Die
HCD1-7202 Album Tags and Accents Die
HCPC-3843 Special Birthday Sentiments Cling Stamps
HCDP1-2121 Dazzling Dahlia Paper Collection
HCS1-460 Bridal Bouquet Stamens-Small
RACP993 Ranger Archival Ink Pad – Red Geranium
RACP430 Ranger Archival Ink Pad – Deep Purple
RACP614 Ranger Archival Ink Pad – Magenta Hue
RACP436 Ranger Archival Ink Pad – Leaf Green
RACP494 Ranger Archival Ink Pad – Majestic Violet
HCDA2-450 Stack and Store Daubers-Pack of 30
HCST1-401 Deluxe Flower Shaping Kit
HCPP1-475 Deluxe Flower Shaping Paper Pack
159723 Designer Dries Clear Adhesive


Other Products:

 Die cutting machine, hot glue gun, hot glue, paper trimmer, white metallic cardstock, foam squares.

For more tips on creating with the flower shaping molds, watch the tutorial at https://youtu.be/FSdPL7nXvQE.


Instructions:

Cut a piece of white metallic cardstock to 7” x 10”, fold in half to create a 5” x 7” card base.  Cut a piece of floral paper from the Dazzling Dahlia paper collection to 4 7/8” x 6 7/8” and adhere to front of card base. Die cut decorative frames using white metallic paper and paper collection. Adhere to card front using foam squares.

Stamp 5 Dazzling Dahlia flowers and 5 leaves on flower shaping paper using Magenta Hue for the flowers and Leaf Green for the leaves. Die cut flowers and leaves with coordinating dies and then color using archival inks and daubers. Shape with Dahlia Shaping Mold and then glue petals together to form flower. Pierce a hole in the middle of flower for the stamens and glue with hot glue.

Die cut swirls and color with green archival ink. Attach flower, leaves and swirls to card using hot glue. Diet cut tag from paper collection, stamp sentiment on tag and adhere to center of card using foam squares.


Thanks for visiting! Hugs!

Marisa


Tuesday, November 3, 2020

Heartfelt Creations - To My Sweet Friend Card

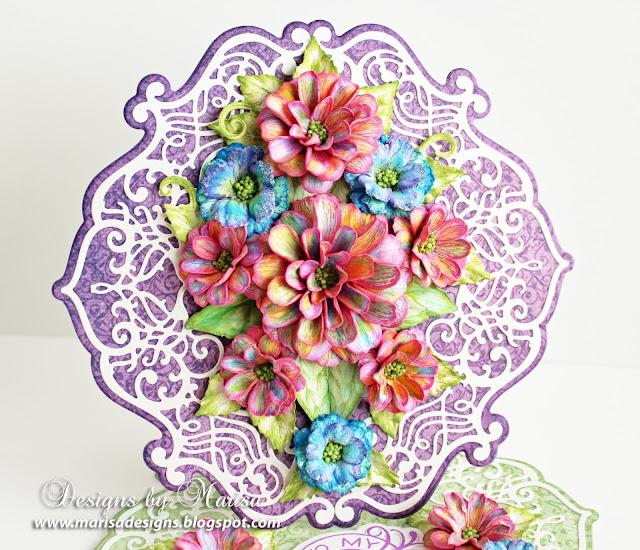
Hello Friends, I have a new card to share with you using Heartfelt Creations products. The Garden Zinnia flowers are one of my favorites. I had so much fun making these flowers. 


Heartfelt Creations Products:


HCD1-7314 Large Garden Zinnia Die

HCD1-7315 Small Garden Zinnia Die

HCPC-3924 Small Garden Zinnia Cling Stamp

HCPC-3923 Large Garden Zinnia Cling Stamp

HCFB1-491 Large 3D Zinnia Mold 1

HCFB1-492 Small 3E Zinnia Mold

HCD1-7263 Swirly Accent Spray Die

HCPC-3835 Leafy Accents Cling Stamps

HCD1-7193 Leafy Accents Die

HCFB1-3D Leafy Accents Shaping Mold

HCD1-7320 Fancy Special Day Die

HCPC-3935 Fancy Special Day Cling Stamp

HCDP1-2106 Wild Aster Paper Collection

ANC852 Bright Ideas Prills – 12 Pack

RACP524 Ranger Archival Ink Pad – Vibrant Fuchsia

RACP436 Ranger Archival Ink Pad – Leaf Green

RACP494 Ranger Archival Ink Pad – Majestic Violet

HCDA2-450 Stack and Store Daubers-Pack of 30

HCST1-401 Deluxe Flower Shaping Kit

HCPP1-475 Deluxe Flower Shaping Paper Pack

159723 Designer Dries Clear Adhesive


Other Products:

Ranger Distress Inks: Carved Pumpkin, Mowed Lawn, Mustard Seed, Picked Raspberry, Wilted Violet, Peacock Feathers. White metallic cardstock, hot glue gun, hot glue, paper trimmer, die cutting machine.


For more tips on creating with the Summer's Garden Collection watch the tutorial at https://youtu.be/kYiP8qJZ4rE.


Instructions:

Cut a piece of white cardstock to 7” x 14” size, fold in half. Die cut shaped card using outer frame die from the Swirly Accent Spray Die set. Fold front panel in half to create easel card. Die cut deep purple front panel and green inside panel from the Wild Aster paper collection using same outer frame die. Glue pieces to card base.  Die cut 4 decorative frames from white metallic cardstock. Glue to front and inside of the card.

Stamp multiple Zinnias with Garden Zinnia Cling Stamp sets in Vibrant Fuchsia ink onto white cardstock and die cut with coordinating dies. Stamp leaves in Leaf Green ink onto white cardstock, die cut with coordinating die. Color flowers and leaves with Distress inks using Daubers. Shape flowers using Deluxe Flower Shaping kit and Zinnia molds. Embellish center of flowers with Prills. Adhere flowers and leaves to center of front panel and inside panel. 

Stamp sentiment with Majestic Violet ink onto white cardstock, die cut with matching die and adhere to inside of card.


Thanks for visiting!

Marisa


Tuesday, October 6, 2020

Heartfelt Creations Best Wishes Card

Hello Friends,
I love making shaped cards, and the Decorative Circle Frame die set from Heartfelt Creations makes it so simple. I really like how it turned out.


Heartfelt Creations Products:


Other Products: 

White cardstock, hot glue gun, paper trimmer, die cutting machine.


For more tips on creating with the Wild Aster Collection watch the tutorial at https://youtu.be/1mriCKqh-Ac

Instructions:

Cut a piece of white cardstock to 7” x 10” size, fold in half. Die cut shaped card using outer frame die from the Decorative Circle Frames Die set. Die cut deep purple front panel from the Wild Aster paper collection using same outer frame die. Glue pieces together.  Die cut decorative frame from white cardstock. Glue to front of the card. Die cut circle from paper collection and glue to center of card.

Stamp Wild Asters from Wild Aster Cling Stamp set in Vibrant Fuchsia ink onto white cardstock and die cut with coordinating dies. Stamp leaves in Leaf Green ink onto white cardstock, die cut with coordinating die. Color flowers and leaves with Archival inks using Daubers. Shape flowers using Deluxe Flower Shaping kit. Embellish center of flowers with Prills. Adhere flowers and leaves to top and bottom of card.

Die cut sentiment from Ornamental Tags die set using white cardstock and layer onto purple cardstock from collection. Adhere to center of card.


Thanks for visiting!

Marisa


Tuesday, August 25, 2020

Heartfelt Creations Hydrangea Card

Hello Friends! I have a new card to share with you created with the beautiful Cottage Garden Collection by Heartfelt Creation.


Heartfelt Creations Products:


Other Products:

White cardstock, hot glue, hot glue gun, scissors, paper trimmer, die cutting machine.

For more tips on creating with the Collage Garden Collection watch the tutorial at

Instructions

Cut a piece of white cardstock to 10” x 7” size, score and fold at 5”. Die cut shaped card using largest die from Royal Elegance Frames Die set. Die cut another piece with the same die with green cardstock from the Cottage Garden Paper Collection and then glue to card base. Die cut 2 decorative pieces with white cardstock and adhere to card front with glue.

Stamp Hydrangea and multiple flowers using Cottage Garden Hydrangea stamp set with pink ink onto Flower Shaping paper. Die cut with coordinating dies and then color flowers and leaves with Archival inks using Daubers. Shape flowers using shaping mold and then embellish the center of flowers with Crystal Drops. Adhere flowers to Hydrangea using hot glue gun and then to center of card front. Die cut sentiment and glue onto card as shown.


Thanks for visiting! Have a great week!

Marisa


Tuesday, June 30, 2020

Heartfelt Creations Treasured Heart Gift Basket

Hello Friends,
I had so much fun making this basket created with the new Treasured Heart Box Die by Heartfelt Creations. The dies have all the cutting and folding lines for you to assemble this box very easily. The flowers were created with the stamps, dies and shaping mold in the Wild Rose Collection.


Heartfelt Creations Products:


Other Products:
Neenah Royal Sundance Cover Felt Finish in White, Nuvo Crystal Drops-Glitter Drops-Honey Gold.
For more tips on creating with the Wild Rose Collection watch the tutorial at  https://youtu.be/2ALPhFnT-qI
Instructions:
1. To create gift box/basket use Treasured Heart Gift Box Die. Die cut 6 side pieces using larger box side die and decorative insert die with white cardstock. 


2. Die cut top decorative layer in gold cardstock and adhere to 6 box sides with glue. Die cut top layer for 6 petals in gold cardstock and adhere with glue. 


3. Using a bone folder, fold along all of the score lines that the die created. Fold along 6 box side pieces along all score lines and adhere panels together by gluing at the seams to create the hexagon box. You can also use strong tape along tabs instead of the glue. 


4. To assemble hexagon box, die cut 2 hexagon box base pieces with white cardstock. Adhere one base piece to the outside bottom of the box first and then the other base piece to the inside of the box bottom. To create handle, die cut 5 decorative heart pieces in gold cardstock and glue on a strip of white cardstock measuring 1” x 10” long. Adhere handle to basket.


5. Stamp the flowers using Small Wild Rose Cling Stamp Set with Rose Madder Archival Ink Pad onto white cardstock. Die cut flowers with coordinating Small Wild Rose Die and then shape with coordinating Wild Rose Shaping Mold. Color flowers using Monarch Orange and Rose Madder Archival Inks and daubers. Embellish center of flowers with Minnie Pearls Prills and Adhesive.


6. Stamp leaves using Leafy Accents Cling Stamp Set with Leaf Green Archival Ink onto white cardstock. Die cut leaves with coordinating Leafy Accents Die and then shape with coordinating Leafy Accents Shaping Mold. Color leaves with Leaf Green Archival Ink. Embellish flowers and leaves with Nuvo Crystal Drops Glitter.


7. Decorate basket by gluing flowers and leaves on the basket handle and side petals.


Here is another box created with the same Treasured Heart Gift Box Die. For the paper I used Heartfelt Creations Tulip Time Paper Collection.


Thanks for visiting! Hugs!

Marisa