Tuesday, October 29, 2013

Heartfelt Creations Wednesday - PostCard

Hello Friends!
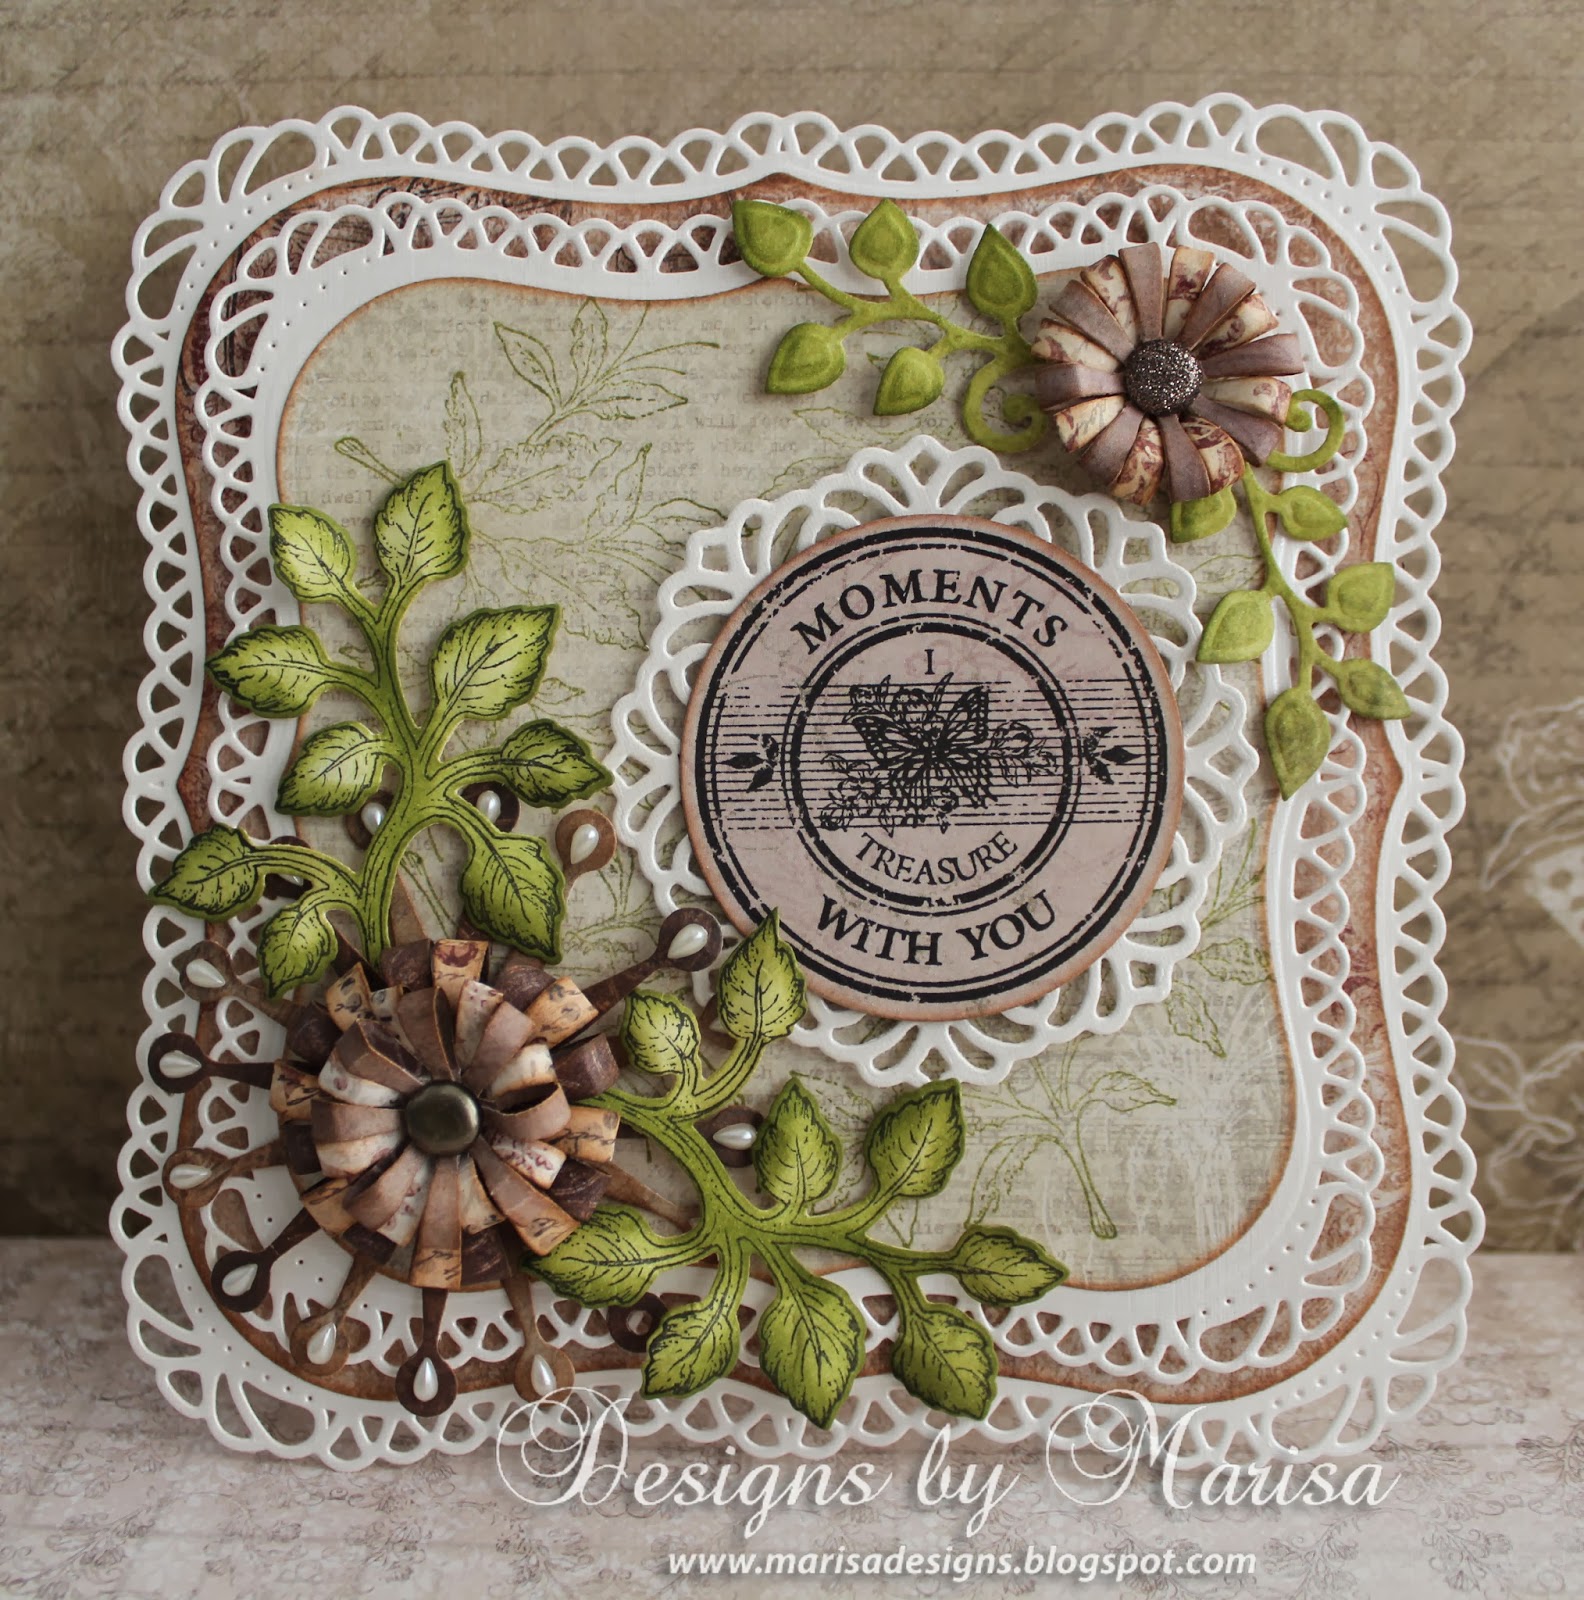
It's Wednesday and time for some Heartfelt Creations inspiration. Today I have another card using the beautiful Sweet Juliet Collection.


Heartfelt Creations Products:

Other Supplies:
Neenah Papers Natural White Cardstock, Brown Cardstock, Memento Ink Pad Rich Cocoa, Ranger Distress Ink Pads, Bronze Pearls, Brad, Foam Squares.

Instructions:
Make a 5” x 7” card base using Natural White cardstock. Die cut largest Spellbinders Exquisite Labels Eleven in brown cardstock, adhere to card.
Stamp PostCard stamp with brown ink onto natural white cardstock. Color with distress inks, cut and adhere to card.
Stamp Sun kissed Fleur flowers with brown ink onto Antiquity Paper Collection. Die cut with coordinating Sun Kissed Fleur die. Shape flowers, layer petals and adhere to card using foam squares.
Stamp Open Leaf, die cut with coordinating die from the Classic Leaf Die set and glue under flower.
Die cut 2 small Sweet Juliet flowers and assemble using a brad. Glue to center of flower. Die cut vine and glue under flowers.

Embellish flowers with bronze pearls as pictured.

Be sure to visit the Heartfelt Creation Blog for more inspiration.

Thanks for visiting! Hugs!

Marisa


Tuesday, October 22, 2013

Heartfelt Creations Wednesday - Moments I Treasure with You Card

Hello Friends!
Welcome to another Heartfelt Creations Wednesday. Here is the card I created this week with the new Sweet Juliet Collection.


Heartfelt Creations Products:

Other Supplies:
Spellbinders Vintage Lace Accents and Grand DecorativeLabels One, Pearl Metallic Cardstock, Neenah Papers Natural White Cardstock, Memento Tuxedo Black Ink Pad, Ranger Distress Ink Pad, Brads, Pearls, Foam Squares.

Instructions:
Card base is about 6” x 6”. Using Pearl Metallic cardstock and Antiquity Paper Collection die cut card base with Spellbinders Grand Decorative Labels One and Grand Labels One die sets. Die cut next layers using smaller dies from the same sets. Adhere layers using foam squares.
Die cut flowers and leaves with Sweet Juliet die set using Antiquity Paper Collection and layer flowers using a brad. Die cut 2 more flowers with smaller die, embellish the ends with pearls and place under larger flower. Adhere flowers to card corners.
Stamp and die cut leaves using Classic Leaf stamp and die. Color with distress ink and adhere to card.
Die cut doily from the Vintage Lace Accent die set. Stamp sentiment from Moments With You stamp set. Layer pieces together and adhere to center of card with foam squares.

Be sure to visit the Heartfelt Creation Blog for more inspiration.

Thanks for visiting! Hugs!

Marisa


Tuesday, October 15, 2013

Heartfelt Creations Wednesday - Sweet Juliet Gift Box

Hello Friends!
I'm having so much fun making flowers with the new Heartfelt Creations die called Sweet Juliet. It is really easy to use, all you need is a brad to assemble the flower after die cutting it, all the work is in the die.


Heartfelt Creations Supplies:


Other Supplies:
Neenah Papers Natural White Cardstock, Ranger Distress Ink, Gold Brad.

Instructions:
1. Gift box is 3 ½”  x  2 ¼ “.  Using largest die from the Gift Ensemble Die set, die cut 4 pieces using Delicate Asters Paper Collection. Fold at creasing lines and glue lacey sides together to form box.  Fold top and bottom flaps at creasing lines and close by overlapping flaps and tucking the last flap under the first one.
2. Cut 4 panels using Delicate Asters Paper Collection measuring  3 3/8” x 2 1/8”, glue to gift box sides.  Add color to edges of box using distress ink.
3. Die cut Sweet Juliet flowers, 2 pieces for each die using Delicate Asters Paper Collection. Layer flower pieces together using a gold brad. First assemble the smaller flower pieces by passing through the brad and then the larger flower pieces. Die cut 2 more pieces using the larger die, layer both pieces and glue under assembled flower.

4. Stamp Open Leaf stamps, die cut with coordinating dies from the Classic Leaf Die set. Color with distress inks and glue under flower. Attach assembled flower to top of box as pictured using foam square.

Be sure to visit the Heartfelt Creations Blog for more inspiration.

Thanks for visiting! Hugs!

Marisa


Tuesday, October 8, 2013

Heartfelt Creations October Release - You Are Such a Blessing to Me Card

Hello Friends!
We are pleased to introduce the Sweet Juliet CollectionThis collection is inspired by the beauty of ancient rooms locked away and laden with antique treasures. These rooms are filled with yellow candlelight and dusty vases. Crinkly letters lay scattered around, turning crisp and fading more every day. A postcard lays covered in thick dust, forgotten in a dark corner. Wildflowers lay around, as crisp and crinkled as the beautiful wallpapers. Using these detailed floral and typographical stamps, complemented by black, gold and burgundy papers will enable you to create an outstanding classical creation. 
Leave a comment on the Heartfelt Creations blog by October 15th and you will be eligible to win the entire collection valued at $150.


Heartfelt Creations Supplies:


Other Supplies:
Neenah Papers Natural White Cardstock, Rangers Distress Inks, Memento Rich Cocoa Ink, Metal Brads, Foam Squares.

Instructions:
Make a square card base measuring 6 ¼” x  6 ¼” using natural white cardstock. Cut a 6” x 6” layer using Antiquity Paper Collection, distress and color edges with distress ink and adhere to card.
Cut next layer 5 ” x  2 ½” using Antiquity Paper Collection, cut a larger frame with natural white cardstock, distress and color edges, layer together and adhere to card.
Cut next layer 3 ¼” x 4 ¼” using Antiquity Paper Collection, stamp sentiment from the Blessing to Me stamp set using brown ink. Cut a larger frame with natural white cardstock, distress and color edges, layer both pieces together and adhere to card using foam squares.
Die cut Decorative Lattice Swirl using natural white cardstock, color with distress ink and adhere to card.
Using Antiquity Paper Collection, die cut Sweet Juliet flowers, 2 pieces for each flower. Layer together using a brad and attach to card as pictures.
Stamp Open Leaf stamps, die cut with coordinating dies from the Classic Leaf Die set. Color with distress inks and attach to card under flowers

Be sure to visit the Heartfelt Creations Blog for more inspiration.

Thanks for visiting! Hugs!

Marisa


Saturday, October 5, 2013

JustRite Papercraft October Release - Bundle of Job Vintage Labels Five Clear Stamps

Hello Friends!
Welcome to Day 6 and last day of the JustRite Papercraft October Release. Today we are showcasing another beautiful baby set called Bundle of Joy Vintage Labels Five. This set has 30 clear stamps and it coordinates with the new Vintage Labels Five Dies. I used both sets for my card.


Bundle of Joy Vintage Labels Five Clear Stamps      Vintage Labels Five Dies


These little cards are so cute and easy to make. I started by cutting a piece of cardstock measuring 10 " x 4", I folded it in half. Using the largest die from the Vintage Labels Five Dies set, die cut folded piece by placing fold right under the top cutting line from die.
The sentiments and labels from the Bundle of Joy Vintage Labels Five set were stamped on natural white cardstock with black ink. I also stamped the small stroller, fussy cut and colored with Copic markers. The booties on the white card are from the Special Delivery Clear Stamps set. The decorative ovals behind the labels were die cut with Spellbinders Floral Ovals.
The small roses were die cut with Spellbinders Rose Creations. For the bows I used May Arts silk ribbon from The Stamp Simply Ribbon Store.

Supplies:

JustRite Papercraft: Bundle of Joy Vintage Labels FiveVintage Labels Five DiesSpecial Delivery.
Spellbinders Dies: Floral OvalsRose Creations.
Other Supplies: Neenah Papers Natural White Cardstock, Pink Cardstock, Pearl Metallic Cardstock, Memento Tuxedo Black Ink Pad, Copic Markers, Adhesive Pearls, Adhesive Foam Squares, May Arts silk ribbon from The Stamp Simply Ribbon Store.

Be sure to stop by the new JustRite Papercraft website and log in to your account and reset your password to activate your account.


Be sure to visit the JustRite Papercraft Blog for more inspiration. Visit the links below to see the beautiful projects the other Design Team members have created.

Marisa Job (here)


Thanks for visiting! Hugs!

Marisa


Friday, October 4, 2013

JustRite Papercraft October Release - Special Delivery Clear Stamps

Hello Friends!
Welcome to Day 5 of the Justrite Papercraft October Release. Today we are introducing a beautiful stamp set called Special Delivery Clear Stamps, this set has 24 clear stamps that are perfect for baby showers or the arrival of a precious baby. For my card I also used the new Vintage Labels Six Dies.


These are the Justrite Papercraft stamps and dies I used for my card:

  Special Delivery Clear Stamps    Vintage Labels Six Dies


To make a Center Step Card, follow the instructions by clicking HERE. I used pink cardstock for the card base and for the panels I used designer cardstock. I distressed and colored the edges with Distress Inks.
I used the largest die from the Vintage Labels Six Dies set to die cut the frame for the sentiment. The sentiment from the Special Delivery Clear Stamps set was stamped on natural white cardstock with black ink and die cut with Spellbinders Classic Ovals Small. I used foam squares to adhere both to the center of the card.
I stamped the stork, booties, girl banner and rattle on natural white cardstock with black ink. I fussy cut all the images and colored them with Copic markers. I used foam squares to adhere to card as pictured.
The flowers were die cut with Spellbinders Carnation Creations and the leaves were die cut with Spellbinders Botanical Swirls and Accents.

Supplies:

JustRite Papercraft: Special Delivery Clear StampsVintage Labels Six Dies.
Spellbinders Dies: Carnation CreationsBotanical Swirls and AccentsClassic Ovals Small.
Other Supplies: Prima Marketing Delight Paper Collection, Neenah Papers Natural White Cardstock, Pink Cardstock, Memento Tuxedo Black Ink Pad, Copic Markers, Ranger Distress Inks,

Be sure to visit the brand new JustRite Papercraft Website and JustRite PaperCraft Blog. For more inspiration visit the links below to see the beautiful projects the Design Team members have created.

Marisa Job (here)


Thanks for visiting! Hugs! 

Marisa


Thursday, October 3, 2013

JustRite Papercraft October Release - Ornate Corners Clear Stamps

Hello Friends!
Welcome to Day 4 of the JustRite Papercraft October Release. Today we are introducing Ornate Corners Clear Stamps, a beautiful set of 13 Clear Stamps and Rose Garden Background Cling Stamp. For my card I also used Elegant Corners Labels Four Background Cling Stamp which was introduced yesterday.


These are the stamps I used for my card:


   Ornate Corners Clear Stamps        Elegant Corners Labels Four Background Cling Stamp


Instructions:

1. Card measures 7" x 6"  when folded. For the card base, cut a 6" x 12" piece of cardstock, I used Pearl Metallic cardstock.
2. Crease at 2 3/8", 3 5/8", 8 3/8", 9 5/8. Fold creases as pictured.
3. Cut one 4 5/8" x 5 7/8" panel for the center of card using designer paper. Stamp Elegant Corners Labels Four Background Cling Stamp using Versamark and white embossing powder. Use heat gun to set and adhere to center of card base. Use Birthday Wishes For You Cling Stamps for the sentiment.
4. Cut 2 panels measuring 1 1/8" x 5 7/8", color edges with distress ink and adhere to card base next to center panel.
5. Cut 2 panels measuring 2 1/4" x 5 7/8", color edges with distress ink. Stamp corners using Ornate Corners Clear Stamps with Versamark and white embossing powder. Use heat gun to set and adhere to card.
6. Die cut flowers and leaves using Spellbinders Rose Creations and Foliage and adhere to card using foam squares. Embellish flowers with pearls.

Supplies:

JustRite PapercraftOrnate Corners Clear Stamps, Elegant Corners Labels Four Background Cling StampBirthday Wishes For You Cling Stamps.
Spellbinders DiesRose CreationsFoliage.
Other Supplies: Prima Marketing Firefly Paper Collection, Pearl Metallic Cardstock, Ranger Distress Inks, Versamark, White Embossing Powder, Pearls.

Be sure to visit the links below to see more projects created by the JustRite Papercraft Designers.


Marisa Job (here)


Thanks for visiting! Hugs!

Marisa

Tuesday, October 1, 2013

Heartfelt Creations Wednesday - Vintage Floret Card

Hello Friends!
It's time for some Heartfelt Creations inspiration! Today I have a card using the beautiful Vintage Floret  stamps and dies and Decorative Leafy Frame Die as the focal point.


Heartfelt Creations Products:


Other Supplies:

Neenah Papers Natural White Cardstock, Pink Cardstock, Pearl Metallic Cardstock, Memento Tuxedo Black Ink, Ranger Distress Inks, Seam Binding Ribbon, Pearls, Adhesive Foam Squares.

Instructions:

Card base is 6” x 8”. Using Daphne Paper Collection cut 2 layers measuring 4 7/8” x 6 ¾” and 5 7/8” x 7¾”. Adhere to card.
Die cut Decorative Leafy Frame using natural white cardstock, color with distress inks and adhere to card using foam squares.
Die cut 2 small windows from the Decorative Chateau Gate Die set using pearl metallic cardstock and glue under Decorative Leafy Frame.
Stamp Vintage Floret flowers on natural white cardstock with black ink, die cut with coordinating dies from the Vintage Floret Die set. Color flowers with distress inks, shape and layer on card using foam squares. Embellish with pink pearls. Make a bow using seam binding ribbon and adhere to card.

Please be sure to visit the Heartfelt Creations Blog for more inspiration.


Thanks for visiting! Hugs!

Marisa


JustRite Papercraft October Release - Black-Eyed Susan Vintage Labels Five

Hello Friends!

Welcome to Day Two of the JustRite Papercraft October Release. Today we are showcasing a beautiful set of 20 Clear Stamps called Black-Eyed Susan Vintage Labels Five. This set also coordinates with Vintage Labels Five Dies.


These are the JustRite Papercraft stamps and dies I used for my card:


      Vintage Labels Five Dies

For my 6" x 6" card base I used black cardstock and then added 2 more layers. I stamped the flowers from Black-Eyed Susan Vintage Labels Five set on designer paper with black ink. I colored the flowers with Copic markers and added gold glass beads to the center of the flowers.
I used the largest die from the Vintage Labels Five Dies set to die cut the frame in kraft cardstock and adhered to card.
The sentiment and label from the Black-Eyed Susan Vintage Labels Five set were stamped in black ink onto designer paper. I then die cut it with the coordinating die from Vintage Labels Five Dies set and adhered to card using foam squares.
For the pink bow I used seam binding ribbon from The Stamp Simply Ribbon Store.


Supplies:

JustRite Papercraft: Black-Eyed Susan Vintage Labels Five Vintage Labels Five Dies.
Other Supplies: Prima Marketing Delight Paper Collection, Memento Tuxedo Black Ink, Rangers Distress Inks, Want2scrap Self Adhesive Bling Fancy Waves Border, Seam Binding Ribbon from The Stamp Simply Ribbon StoreJudikins Gold Glass Beads.

Be sure to visit the JustRite Papercraft Blog and the links below for more inspiration.

Marisa Job (here)


Thanks for visiting! Hugs!

Marisa