Tuesday, January 29, 2013

Heartfelt Creations Wednesday - Happy Birthday Tag

Hello Friends!
Welcome to another Heartfelt Creations Wednesday!! I love making tags and this tag was a lot of fun to make. I love the new corner dies from the Decorative Blossom Corner Die set.


Products Used:

Other Products:
Pearl Metallic Cardstock, Natural White Cardstock by Neenah Papers, Bronze Pearls by Want2Scrap, Seam Binding Ribbon from The Stamp Simply Ribbon Store, Foam Squares by Scrapbook Adhesive, Broken China and Vintage Photo Distress Inks by Rangers.

Instructions:
Cut metallic cardstock to 8” x 4” for tag base, cut designer paper to 7 7/8” x 3 7/8”, adhere to tag base.  Die cut large decorative corner and adhere to bottom of tag.
Cut smaller tag to 7” x  3 5/8” with metallic cardstock, cut designer cardstock to 6 7/8” x 3 ½”, adhere to tag. Die cut decorative label with metallic cardstock.  Cut out sentiment from Country Evening Paper Collection, adhere to decorative label and then onto tag using foam squares.
Stamp and die cut flowers and leaves, color with distress inks. Shape flowers and then layer to make flowers.  Embellish flowers with bronze pearls and adhere to tag as pictured.
Make a bow using seam binding ribbon and glue to tag.

Be sure to visit the Heartfelt Creations Blog to see the beautiful projects the Design Team Members have created. 

Thanks for visiting!! Hugs!

Marisa

Wednesday, January 23, 2013

Heartfelt Creations Wednesday - Chest of Drawers

Hello Friends!
Welcome to another Heartfelt Creations Wednesday! I had so much fun creating this project, I hope you feel inspired to try to make one too.


Supplies Used:

Other Supplies:
Nature Garden Paper Collections by Prima Marketing, Pearl Metallic Cardstock, Rich Cocoa Memento Ink by Tsukineko, Hazelnut Acrylic Paint Dabber by Rangers, Vintage Photo Distress Ink by Rangers, Chest of Drawers by Kaiser Crafts, Pearls.

Instructions:
Before assembling the chest of drawers, paint the edges of all pieces with Hazelnut Acrylic paint. Cover all the pieces with Nature Garden Paper Collection.
Die cut decorative small square window with pearl metallic cardstock to make a picture frame. Cut out images from designer paper and adhere behind frame. Attach picture frame to top of chest as pictured.


Die cut 3 decorative posy toppers with pearl metallic cardstock and adhere to drawers.
Using designer paper, stamp flowers and leaves using Botanical Floral and Daisy Patch PreCut sets, die cut with coordinating dies. Color edges with distress inks, shape petals and layer to form flowers. Decorate the front and top of the chest with flowers, leaves and pearls.


Be sure to visit the Heartfelt Creations Blog to see the beautiful projects the Design Team Members have created.
Thanks for visiting! Hugs!

Marisa


Wednesday, January 16, 2013

JustRite Papercraft CHA Release - Candy Basket

Hello Friends!

This is my second post for today, if you are looking for Heartfelt Creations Inspiration, please scroll down.

Welcome to another day of JustRite Papercraft CHA Release. I am having so much fun creating projects with all the beautiful stamps and dies in this release!! For my project today I decided to make another candy basket using the new Sympathy Vintage Labels, a set of 9 beautiful cling stamps. I also used the matching die from the Vintage Label and Banner Die set to cut the basket base.


         Justrite Stampers Papercraft | CL-03980 Sympathy Vintage Labels Cling stamps | Cling Stamps made in the USA  | colored storage boards.            Spellbinders Nestabilities are paper cutting and embossing dies sold in sets They create paper shapes at 1/4th and 1/8th inch increments that help create cards and scrapbooking pages with stunning visual effects. They are universal and work in most die cu

Instructions:

1. To make the basket, first cut a 4  3/4" x 4  3/4" square with black cardstock for the base. Score a  1/2 inch mark on 4 sides and cut the corners out.
2. Stamp 4 labels from the Sympathy Vintage Labels stamp set on beige cardstock and die cut with coordinating die from the set "Vintage Label & Banner Dies", color with Copic Markers.  Also die cut 4 labels for the inside of the box in black cardstock. 


3. For the handle, stamp smaller flower image 5 times, fussy cut, color and glue together on a 1/2" x 11" strip of cardstock as pictured. 


4. Die cut flowers and leaves using Carnations Creations and Foliage Two die sets by Spellbinders. I used the smaller flower dies. Layer petals and embellish with a pearl in the center and adhere to basket and handle top.

5. To form the basket, punch a small hole in each corner and tie a bow with silk ribbon holding both sides together. Attach handle to the sides with strong tape or glue. Adhere the 4 black labels to the inside of the basket, this will hide the handle and make the basket sturdier.


6. For the tag and sentiment I used the stamp set For All You Do.

I hope you are inspired to make this basket, it does not take that long and having the coordinating dies for the images makes it really easy to die cut and assemble the basket. 

Supplies:
Spellbinders: Carnations Creations and Foliage Two die sets
Other: Firefly Paper Collection by Prima, Black Cardstock, May Arts Silk Ribbon from The Stamp Simply Ribbon Store, Pearls from Want2Scrap, Copic Markers.

Be sure to visit the following JustRite Papercraft Designers to see their beautiful creations.


Thanks for visiting! Hugs!

Marisa


Tuesday, January 15, 2013

Heartfelt Creations Wednesday - I am the Way Card

Hello Friends!
It's Wednesday, which means it is time for some inspiration from Heartfelt Creations! For my card I used the new Country Evening Collection, I just love everything about this new collection!!


Other:
Pearl Metallic Cardstock, Natural White Cardstock by Neenah Papers, Peeled Paint, Stormy Sky and Victorian Velvet Distress Inks by Rangers, Tuxedo Black Memento Ink by Tsukineko, Labels One Die Set, Decorative Labels One Die Set by Spellbinders, White Pearls, Pearl Pin, Foam Squares by Scrapbook Adhesive.

Instructions:
Cut pearl metallic cardstock to 6”x 12”, fold in half to make a 6” x 6” card base. Cut Designer paper to 5¾” x 5 ¾” and adhere to card base. Die cut Decorative Corner with metallic cardstock and adhere to card.
Die cut Decorative Labels One with pearl metallic cardstock. Stamp sentiment with black ink on natural white cardstock, die cut with Labels One die set, adhere to Decorative Label and then onto card as pictured.
Stamp flowers and leaves on natural white cardstock, die cut with coordinating dies and color with distress inks. Shape petals, layer to make flowers and adhere to card using foam squares. Embellish flowers and card with pearls.

Be sure to visit the Heartfelt Creation Blog to see the other Designer's projects!

Thanks for visiting! Hugs!

Marisa


Monday, January 14, 2013

JustRite Papercraft CHA Winter Release - For All You Do Stamp Set

Hello Friends!
Welcome to JustRite Papercraft CHA Winter Release!! Today we are introducing another gorgeous rubber stamp set called For All You Do which is designed to coordinate with JustRite Vintage Label Three Dies custom made by Spellbinders.


  Justrite PaperCraft CHA Winter Release | For All You Do Vintage Labels Three, scrapbooking and craft ideas with rubber stamps, clear stamps and cling stamps | Clear stamps |     JustRite custom dies are manufactured by Spellbinders. Designed to coordinate with JustRite Clear and Cling Stamps. Dies cut and emboss and work in most diecutting machines


For my card, I decided to make a 6" x 6" card with Kraft cardstock as the base. I cut the next layer with designer paper and adhered to card. The white swirls in the background were die cut with Botanical Swirls by Spellbinders.
I stamped the label and sentiment with black ink on designer paper and then die cut with coordinating die.
The flowers were die cut with Posy Patch die set and the leaves were die cut with Foliage Two by Spellbinders, I embellished the flower centers with pearls from Want2Scrap.
For the bow I used seam binding ribbon from The Stamp Simply Ribbon Store.

Supplies:
JustRite Papercraft: For All You DoVintage Label Three Dies
Spellbinders Dies: Botanical SwirlsPosy PatchFoliage Two
Other: Firefly Paper Collection by Prima, Kraft Cardstock by Bazzill, Natural White Cardstock by Neenah Papers, Seam Binding Ribbon from The Stamp Simply Ribbon Store, Pearls from Want2Scrap

Be sure to visit the following JustRite Designers to see their beautiful creations.

 Marisa Job (here)

Thanks for visiting! Hugs!

Marisa


Wednesday, January 9, 2013

JustRite Papercraft CHA Winter Release - Ornate Squares Card

Hello Friends!

This is my second post for today, if you are looking for Heartfelt Creations Inspiration, please scroll down.

Welcome to Day 5 of the Justrite Papercraft Winter CHA Release! You are going to love today's stamp set! Today we are introducing Ornate Happiness Squares, a set of 38 Clear Stamps, designed to coordinate with Spellbinders new Ornate Squares die set.


      Justrite PaperCraft CHA Winter Release | Ornate Happiness Squares, scrapbooking and craft ideas with rubber stamps, clear stamps| Clear stamps |     Ornate Squares Dies, JustRite stamps that coordinate with ornate square dies, Samantha Walker Dies and coordinating stamps, Samantha Walker Spellbinders Dies, Samantha Walker JustRite Stamps

My card measures 6" x 6". The image was stamped with Tuxedo Black ink on pink cardstock. Die cut Ornate square and adhere to card on top of sentiment as pictured.
The flowers were die cut with designer paper using Rose Creations, the leaves and swirls were die cut using Foliage Two by Spellbinders.

Supplies:
JustRite Papercraft: Ornate Happiness Squares
Spellbinders Dies: Ornate SquaresRose CreationsFoliage Two
Other: Romance Novel Paper Collection by Prima Marketing, Natural White Cardstock by Neenah Papers, Gold Brads, Foam Squares by Scrapbook Adhesives.

Be sure to visit the following JustRite Papercraft Designers to see their beautiful creations.


Thanks for visiting! Hugs!

Marisa


Tuesday, January 8, 2013

Heartfelt Creations Countryside Evening Collection - Trust in the Lord Card

Hello Friends! 
Heartfelt Creations has created a delightful ‘Countryside Evening’ for you. There’s beautiful typography, countryside scenes, one awesome die, and 24 beautiful papers.This set is a beautiful choice for the beautiful moments. Get yours now at www.heartfeltcreations.us. Leave a comment on the Heartfelt Creations Blog by January 15th and you will be eligible to win the entire release valued at $150.92 .

This is the card I created using the new Countryside Evening Collection.


Products Used:

Other Supplies:
Pearl Metallic Cardstock, Natural White Cardstock by Neenah Papers, Black Tuxedo Memento Ink, B45, G85 and G20 Copic Markers, Stormy Sky and Forest Moth Distress Ink, White Pearls, Silk Ribbon by May Arts.

Instructions:
Card measures 6” x 6” when folded. To make card base cut pearl metallic cardstock to 6” x 12”. Score at 2 ½”, 4”, 8”, 9 ½”. Fold first score line to front, fold second score line to back. Repeat on other side of card.
Using Countryside Evening Paper Collection, cut two 2 3/8” x  5  7/8” pieces, two 1 3/8” x  5 7/8” pieces and one 3 7/8 “ x  5 7/8” piece. Adhere to card. Stamp Petite Floral Swirls on side panels with black ink and color with Copic Markers.


Die cut two of the larger Decorative Blossom Corners with pearl metallic cardstock, adhere to center of card. Cut sentiment from Countryside Evening Paper Collection, mat with pearl metallic cardstock and adhere to card center with foam squares.
Stamp Vintage Floret Flowers on Natural White cardstock, die cut with coordinating dies. Color with distress ink. Shape flowers and leaves,  layer on card as pictured. Embellish flowers with white pearls in the center.  Make a bow with silk ribbon and adhere to card.


Be sure to visit the Heartfelt Creations Blog to see what the Design Team members have created.

Thanks for visiting! Hugs!

Marisa
JustRite Papercraft CHA Release Day 4 - True Friendship Card

Hello Friends!
Welcome to Day 4 of the JustRite Papercraft Winter CHA 2013 Release!! Today's JustRite Papercraft stamp set being released is Good Friends Labels Twenty Nine which coordinates with Spellbinders brand new Labels Twenty Nine die set.


Good Friends Labels Twenty Nine is a set of 10 beautiful Clear Stamps. I love the largest label which can be die cut with the largest die from the Labels Twenty Nine die set pictured below.

Justrite PaperCraft CHA Winter Release | Good Friends Labels Twenty-Nine, scrapbooking and craft ideas with rubber stamps, clear stamps and cling stamps | Clear stamps |      JustRite Papercraft |Spellbinders Labesl Twenty Nine Dies |JustRite Compatible stamps

Instructions:
1. Card measures 6” x 5 3/4" when folded. To make card base cut black cardstock to 5 3/4” x 12”. 
2. Score at 2 ½”, 4”, 8”, 9 ½”. Fold first score line to front, fold second score line to back. Repeat on other side of card.
3. Using designer paper, cut two 2 3/8” x  5  5/8” pieces, two 1 3/8” x  5 5/8” pieces, adhere panels to card. 
4. Stamp label on designer paper with Tuxedo Black ink, die cut with coordinating die and color with Copic Markers. Adhere label to center of card and embellish with white pearls.


5. Die cut flowers using Carnation Creations, die cut leaves with Foliage Twoand die cut swirls with Venetian Motifs by Spellbinders. Embellish flowers with white pearls.
6. Make a triple bow with May Arts silk ribbon from The Stamp Simply Ribbon Store.

Supplies:
JustRite Papercraft: Good Friends Labels Twenty Nine
Other Supplies: Firefly Paper Collection by Prima Marketing, Black Cardstock, Tuxedo Black Memento Ink by Tsukineko, Copic Markers, Distress Inks by Rangers, May Arts silk ribbon from The Stamp Simply Ribbon Store, Pearls from Want2Scrap.

Be sure to visit the following JustRite Papercraft Designers to see their beautiful creations!


Thanks for visiting! Hugs!

Marisa


Monday, January 7, 2013

JustRite Papercraft CHA Winter Release - Friends Tag

Hello Friends!
Welcome to Day Three of the JustRite Papercraft Winter CHA 2013 Release!! Today we are introducing Special Gifts Labels Twenty Nine, a set of 18 Clear Stamps. This beautiful stamp set coordinates with the new Labels Twenty Nine die set by Spellbinders.


                  Justrite PaperCraft CHA Winter Release | Special Gifts Labels Twenty Nine, scrapbooking and craft ideas with rubber stamps, clear stamps and cling stamps | Clear stamps |


                                            S5-156 Labels Twenty Nine LG
                       

This tag was very easy to make, all the work is in the beautiful stamps and dies. First die cut the tag with the largest  Labels Twenty Nine die using designer cardstock. Color the borders with distress ink. Stamp scroll image from the Special Gifts Labels Twenty Nine set on top and bottom of tag with Tuxedo Black Ink and color with Copic Markers. Stamp label and sentiment, die cut with coordinating die, color with Copic Markers and adhere label to center of tag with foam squares. Embellish tag with pearls and a seam binding ribbon bow.

Supplies:
JustRite Papercraft: Special Gifts Labels Twenty Nine
Spellbinders:  Labels Twenty Nine
Other: Fairy Belle Paper Collection by Prima Marketing, Pearls by Want 2 Scrap, Seam Binding Ribbon by The Stamp Simply Ribbon Store, Tuxedo Black Memento Ink by Tsukineko, Vintage Photo Distress Ink by Rangers.

Be sure to visit the following JustRite Papercraft Designer Members to see their beautiful creations.


Thanks for visiting! Hugs!

Marisa

Sunday, January 6, 2013

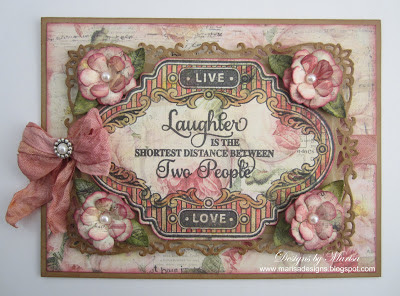
JustRite Papercraft 2013 CHA Winter Release - Laughter Card

Hello Friends!
Welcome to Day Two of the JustRite Papercraft 2013 CHA Winter Release!! Today we are introducing another beautiful new stamp set called Live, Love, Laugh Vintage Labels Two and a new coordinating JustRite Custom die called Vintage Label Two Diesyou are going to love these new sets!!


 Justrite PaperCraft CHA Winter Release | Live, Love, Laugh vintage Labels Two, scrapbooking and craft ideas with rubber stamps, clear stamps and cling stamps | Clear stamps |        JustRite custom dies are manufactured by Spellbinders. Designed to coordinate with JustRite Clear and Cling Stamps. Dies cut and emboss and work in most diecutting machines

I stamped the label and sentiment in Tuxedo Black Memento Ink on designer paper, colored with Copic Markers and die cut with the coordinating die. The decorative label behind the image was die cut with Decorative Labels Eight by Spellbinders. The flowers were die cut using Rose Creations by Spellbinders. The bow was made with seam binding ribbon from The Stamp Simply Ribbon Store.

Supplies:
Other Supplies: Tea-Thyme Paper Collection by Prima Marketing, Kraft Cardstock by Bazzill, Tuxedo Black Memento Ink by Tsukineko, Pearls, Ribbon from The Stamp Simply Ribbon Store, Foam Squares by Scrapbook Adhesive.

Be sure to visit the JustRite Papercraft Blog and the following Designers participating in today's hop!!

Thanks for visiting! Hugs!

Marisa

Saturday, January 5, 2013

JustRite Papercraft 2013 January CHA Release - On Your Special Day Card

Hello Friends!
Welcome to the JustRite Papercraft 2013 January CHA Release!!! You are going to be amazed at the beautiful new stamps and dies JustRite Papercraft has created for you.
For my card today, I used the new Enjoy the Day Vintage Labels Four, a set of 18 clear stamps. These stamps coordinate with the new Vintage Label Four Dies.


For my card I decided to make a Double Z-Fold card, this card is very easy to make. For instructions on how to make this card go HERE. The Lace borders were die cut with Vintage Lace Accents by Spellbinders. The images and sentiments were stamped with Black Tuxedo Ink on Natural White cardstock and die cut with coordinating dies. I colored the images using Copic Markers. The flowers were die cut using designer paper.

Supplies:
Spellbinders: Vintage Lace Accents
Other: Posy Patch Flower Dies by Heartfelt Creations, Heritage Paper Collection by FabScraps, Natural White Cardstock by Neenah Papers, Black Tuxedo Memento Ink by Tsukineko, Copic Markers, Seam Binding Ribbon from The Stamp Simply Ribbon Store, White Pearls, Foam Squares by Scrapbook Adhesives. 

Be sure to visit the the following JustRite Papercraft Designer Members to see their beautiful creations.


Thanks for visiting! Hugs!

Marisa


Tuesday, January 1, 2013

Heartfelt Creations Wednesday - Center Step Card

Hello Friends!
Happy New Year!! I hope you had a wonderful Holiday Season!!
Welcome to another Heartfelt Creations Wednesday! For my Center Step card today I used the beautiful Vintage Floret Collection stamps, dies and designer paper. I love how everything coordinates and it makes it so much easier to design a project.


Supplies Used:

Other:
Kraft Cardstock by Bazzill Paper, Natural White Cardstock by Neenah Papers, Black Tuxedo Memento Ink, Vintage Photo, Victorian Velvet, Peeled Paint and Broken China Distress Inks by Rangers, Seam Binding Ribbon, Pearls, Glue Gun.

Instructions:
Card base measures about  7” x  6”. Make Center Step Card base by following instructions on SplitCoast Stampers using Kraft cardstock. Cover the card base with Vintage Floret Paper Collection.
Die cut biggest rectangle from the Romantic Rectangles die set using Kraft cardstock and adhere to center of card. Cut a 3 3/8” x 5 3/8” piece of Designer Paper and glue on Romantic Rectangle.  Cut sentiment from the Vintage Floret Paper Collection and adhere to center of card.
Stamp flowers and leaves in black ink on Natural White Cardstock using the Vintage Floret flower stamps. Die cut with coordinating dies from the Vintage Floret Die set. Color flowers and leaves with distress inks. Shape flowers and leaves, layer petals to make roses and adhere to card as pictured. Decorate flowers with pearls.
Color seam binding ribbon with Broken China distress ink, make a bow and adhere to card.

Be sure to visit the Heartfelt Creations Blog to see more projects created by the design team.

Thanks for visiting! Hugs!

Marisa