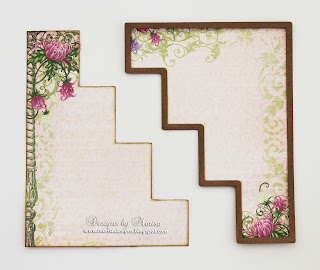
I love making step cards with fancy folds, the die set I used for this card base makes it really easy and it works great with the beautiful papers, stamps and dies from the Enchanted Mum Collection.
Here is the finished card closed:
Supplies Needed:
Other Products:
Spellbinders Happy Days Die Set, Grand Calibur, Neenah
Papers Natural White Cardstock, BoBunny Blush Double Dot Cardstock, Memento
Tuxedo Black Ink, Ranger Distress Ink Pads (Picked Raspberry, Shaded Lilac, Spun
Sugar, Bundled Sage, Dried Marigold, Brushed Corduroy), Foam Squares, Glue.
Instructions:
Die cut 4 step card base using Spellbinders Happy Days die
set and pink cardstock. Using small square dies from the set, die cut 4 small images
from the Enchanted Mum paper collection.
This is the Spellbinders Happy Days die set:
Fold 4 step card base at creases created by the die. Die cut 2 scalloped borders using pink cardstock.
Die cut 2 panels for step card base using step insert die from set and a 6” x 6” square front from paper collection.
Glue 4 small square images and left and right step panel
cuts from paper collection onto pink step card base as pictured.
Stamp Enchanted Mum set onto natural white cardstock
multiple times using ColorBox Fluid Chalk Ink in several colors. Die cut with
coordinating Enchanted Mum die. You need
5 pieces of the smallest flower to make one Mum and only 2 pieces for the
Daisy. I created a total of 3 Mums and 2 Daisies for this card.
Step 7:
Color the edges of flowers with distress or chalk inks. Shape flowers using Deluxe Flower Shaping
Kit. I used the 8mm tip and the curler tip in the set. Layer 5 pieces together using glue to form
Mum. Shape and color 2 flower pieces to
form Daisies and embellish center with Prills.
Step 8:
Stamp Open Leaf and Classic Leaf sets with black ink onto
natural white cardstock. Die cut with
coordinating Classic Leaf die set. Stamp
dragonflies swirl from Enchanted Mum Bouquet set and die cut with coordinating
die from Enchanted Dragonflies die set. Stamp
sentiment banner from Enchanted Dragonflies set and die cut with coordinating
die from Enchanted Dragonflies die set. Color all pieces with distress inks.
Glue scalloped borders to left and right edge of step card
base. Layer Mums, Daisies, dragonflies,
leaves, swirls and sentiment banner on step card base using glue and foam
squares.
I hope you are encouraged to make this card, they are a lot
of fun and you can use any of your favorite Heartfelt Creations Collections.
Thanks for visiting! Hugs!


Beautiful card Marisa! Thank you so much for the tutorial!!!
ReplyDeleteMarisa this is amazing!! Am I the last to know that Spellbinders had a die for this card style?? Oh my goodness, you made a masterpiece out of it! Great job on the tutorial, I'm going to jump in and give this one a try! TFS your talent and inspiration!! Hugs, Anne
ReplyDeleteBeautiful card Marisa,I was wondering how this card was made, thank you soo soo much for the tutorial....well done.
ReplyDeleteHi Marisa
ReplyDeleteI loved the card as I commented before but could not see how it folded flat to post! Doh!
Now I have seen your tutorial and looked at the die set again I am thinking this would be a great addition to my die collection. Thank you so much for showing us how it's done!
Crafty Hugs
Heather xx
Thank you Karen! Thanks also for helping me understand Karen's question! Hugs!
DeleteJust beautiful, love the colours, so pretty
ReplyDeletexo Julie P
Oh wow Marisa, what an amazing design, you are so clever!! Love it!
ReplyDeleteok, you convinced me. I *NEED* these new flowers ASAP! Gorgeous card and amazing flowers, as always! Love your cards Marisa!
ReplyDeleteAbsolutely stunning!
ReplyDeleteHow do you cover the top of the steps with white caardstock and still manage to fold the card?
ReplyDeleteThe square layers for the steps are smaller and they don't interfere with the folding lines.
DeleteMake sure the layers are adhered in the middle and are not touching the score lines and it should fold easily.
DeleteDo you adhere it from the top or the bottom? It looks like either the front of the step or the back of the step has to remain loose so that it can fold flat when the card is folded. Is this correct?
DeleteI think I know now what you are talking about. The white part is not cardstock, it is the back of the card showing through the openings created by the steps. You don't have to add any cardstock at all.
Deletesuper!
ReplyDeleteHi Marisa
ReplyDeleteThank you for the tutorial as I was curious as to how this worked.
Fabulous card!
Best wishes.
Ang x
Thanks so much. Now I understand that the steps remain open. From the picture it looked like the white on the top of the steps was actually part of the card. Thanks for your patience.
ReplyDeleteNo problem! Have fun making the card, it's actually very easy with the die sets.
ReplyDeleteThis looks sooo beautiful!
ReplyDeleteI purchased this die set only last week, a friend brought me hers to show me, and of course I just had to have it. It is so easy to use, and it does fold nicely. I am going to make this card this afternoon for another friend's birthday next week. I dont have the Enchanted Mums paper, but I do have the Peacock collection, hope it turns out ok.
ReplyDeleteI'm so glad you are going to make this card! Have a great weekend!
Delete