Hello Friends,
Welcome to the February Craft Hoarders Anonymous Hop! You
should be coming to my blog from Karen's
Blog. To start at the beginning of the hop, and for
the full list of Bloggers, go to Gloria's Blog.
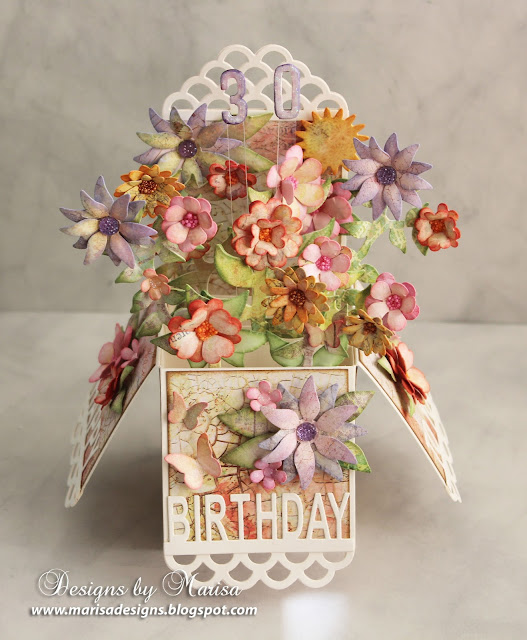
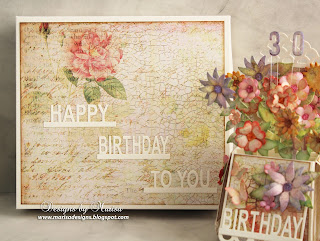
Today I would like to share with you this Card in a Box, also called Pop Up Box that I created for my daughter's birthday. To make the card base I used Spellbinders Scalloped Pop Up Box die set. This die set has all the cutting and folding lines which makes it really easy to assemble your Pop Up Box. For the flowers and leaves I used Spellbinders Marisa's Bouquet die set and for the "Happy Birthday To You" sentiment I used Spellbinders Bordered Sentiments die set.
I designed these dies for Spellbinders last year, they all work together really well to create this project.
I designed these dies for Spellbinders last year, they all work together really well to create this project.
This Flower Pop Up Box can be folded flat for mailing or storing purposes.
Instructions:
1. Die cut
Scalloped Pop Up Box largest die 4 times from natural white cardstock. Fold
tabs in at the crease. Glue 4 pieces together at the tabs to form box. Fold
only 3 flaps down at the crease leaving the back panel straight. Cover all
panels with pattern paper.
2. Die cut 3
small rectangles from the set. Fold rectangles at the creases and glue to
inside of box at 5/8” intervals. These rectangles are the support for the
branches.
3. Die cut
scalloped borders from the set and adhere to box .
4. Die cut
Bordered Sentiments (Happy, Birthday, To You), adhere to box flaps next to
scalloped border.
5. Using
Marisa’s Bouquet set, die cut multiple flowers, branches, leaves and
butterflies. Color with distress inks.
6. Shape
petals and layer together to form flowers.
Adhere branches to rectangles inside box and then attach several sets of
flowers on branches.
7. Decorate
box flaps with more flowers, leaves and butterflies. Die cut 2 sun shapes, layer together and adhere
to back of the box with foam squares.
Embellish center of flowers with pearls.
I also created a square box for the card using the same sentiment dies, cardstock and pattern paper.
Spellbinders
Supplies:
S5-233Scalloped Pop Up Box die set
S6-033
Marisa’s Bouquet die set
S4-512
Bordered Sentiments die set
GC-001 Grand
Calibur Machine
Other Supplies:
Cardstock (Neenah Papers – Natural White, Prima Marketing - Art Journal Pad), Ranger Tim Holtz Distress Ink Pads (Peeled Paint, Vintage
Photo, Victorian Velvet, Seedless Preserves, Shaded Lilac, Scattered Straw),
White and Bronze Pearls.
Blog Hop
Gloria Stengel - http://gloriascraps.blogspot.com/
Debbie Seyer - http://www.debbieseyer.com/
Jacquie Southas - http://jacquiesouthas.blogspot.com/
Tracey Sabella - http://gracescraps.blogspot.com/
Donna Idlet - http://myblogidlet.blogspot.com/
Bonnie Garby - http://www.maketime2craft.com/
Wendi Robinson - http://scrappydayinparadise.blogspot.com/
Teresa Horner- http://victorianpaperqueen.blogspot.com/
Barbara Rankin - http://blackholeartstudio.blogspot.com
Karen Zueger-Brownell - http://lostcoastscrapper.blogspot.com/
Marisa Job - http://www.marisadesigns.blogspot.com
Thanks for visiting! Hugs!


Gorgeous pop up box, the person who receives this will be thrilled. xx
ReplyDeleteI mean your daughter must be thrilled with this beautiful design. (I should read properly before I leave a comment :))
ReplyDeleteliebe marisa, das geburtstagskind wird überglücklich sein....dein gruss ist traumhaft schön....
ReplyDeleteliebe grüsse
ruth..chen;-))
Oh wow this is gorgeous! Love the flowers, so many details and a beautiful card/gift for your daughter.
ReplyDeleteLorraine
Great tutorial and amazing die designs <3
ReplyDeleteAbsolutely stunning, love, love, love it.
ReplyDeletePatricia x
Oh wow! This is so lovely!
ReplyDeleteThank you! Have a great weekend!!
DeleteReally fabulous and so very cleverly put together, - absolutely love it!! Brilliant project!
ReplyDeleteIncredible, beautiful, a work of art.
ReplyDeleteThis is gorgeous and the colour choice is wonderful, beautifully made xo Julie P
ReplyDeleteJust gorgeous Marisa , i love your work )
ReplyDeleteThank you! Have a great weekend!!
DeleteWow, this is gorgeous...your daughter is so lucky to have you. Love your work Marisa!
ReplyDeleteThank you so much! Have a wonderful weekend!!
DeleteWhen my boyfriend saw me on your blog he looked at the title and said I should join hoarders anonymous because I have so many supplies--LOL.
ReplyDeleteYour box is the prettiest one I've seen done. How nice that there is an actual die for it. I'm intimidated by all the scoring involved in a regular tutorial.
As always, your flowers are brought to life. I'm sure your daughter will love it. My daughter just turned 30 and I sent her a paper flowers in a real basket to her office to surprise her.
What a great idea! I'm sure your daughter loved her paper flowers!!!
ReplyDeleteIf you ever do a tutorial, please do one on how you make and color your flowers, they are beautiful. Love this work of art!
ReplyDeletegorgeous box, on my wish list. love your creation, inspiring and beautiful....have a good week-end
ReplyDeleteThis is very beautiful and looks delightful.
ReplyDeleteBeautiful pop up card box!!! The flowers and colors are stunning. Love the wishes around the flaps. Your daughter must have been over the top thrilled to receive such a special card for a special birthday.
ReplyDeleteAnother stunning masterpiece! TFS
ReplyDeleteAbsolutely gorgeous Marisa.
ReplyDeleteAbsolutely gorgeous Marisa.
ReplyDeleteHi Marisa
ReplyDeleteWell isn't this a little box of loveliness.
Truly beautiful.
Best wishes.
Ang x
This is just beautiful. My favorite project of the hop. I know moms are not supposed to pick favorites, but....this is mine for February. Don't tell the other girls. hee hee
ReplyDeletethis is just stunning! I just went and bought all 3 dies needed to make this.I have never made paper flowers or colored them. Is there a tutorial or directions on how you color your flowers?
ReplyDeleteMany thanks
carole
Thank you Carole! The flowers are really easy to make, die cut them from white cardstock, shape them with stylus, color them with distress inks and a dauber. You Tube has hundreds of videos on paper flowers. Have a great weekend!
Deleteok thanks, I was wondering what you colored them with! How did you attach the flowers to the box dividers? acetate?
DeleteI used glue to attach the flowers to the branches and then to the dividers. I used acetate strips to the numbers only. I also cut 2 branches and glue them together for extra support.
Deletebeautiful
ReplyDeletethanks a bunch, i cant wait to try this. I love box cards and this is the best one i have seen.Thanks for sharing
ReplyDelete